Wednesday, January 27, 2016

Keep both English and French audio tracks for ripping Blu-ray on PC/Mac


This guide will leads you to easily rip Blu-ray contens with keeping both English and French audio tracks so you can switch to the desired language during playback. 

I have bought a Blu-ray disc which contains English and French audio tracks. However, I want to watch this Blu-ray movie with my wife. English is my default language while French is her native language. Do you even know what a powerful program could help me to rip my Blu-ray for watching with both English and French audio tracks preserving? So we can freely select the audio track we want. 

Now everything could come to light in this article. Please go on reading. Good news now what you need is only a professional Blu-ray/DVD Ripper Pro- Pavtube ByteCopy that can help you convert Blu-ray movies to MKV/MP4/MOV format with multi-track easily. (Mac version:ByteCopy for Mac). It's an ideal app for you to remove the strict Blu-ray protection and region restrictions and rip Blu-ray contents with multiple audio tracks retaining. 

Let's go deeper to know about the whole process of keeping both English and Frenck audio tracks for ripping Blu-ray to MKV/MP4/MOV with multi-track with ByteCopy. 

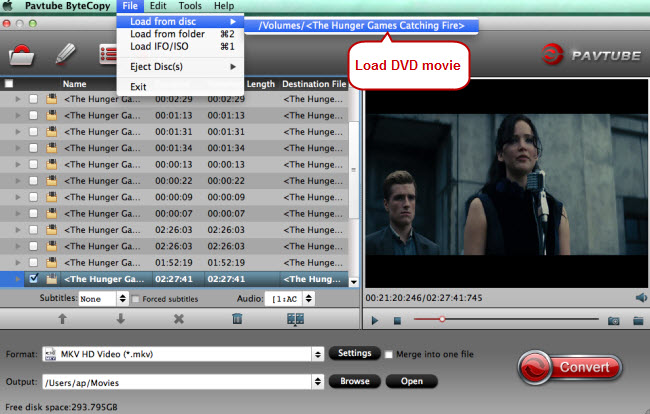
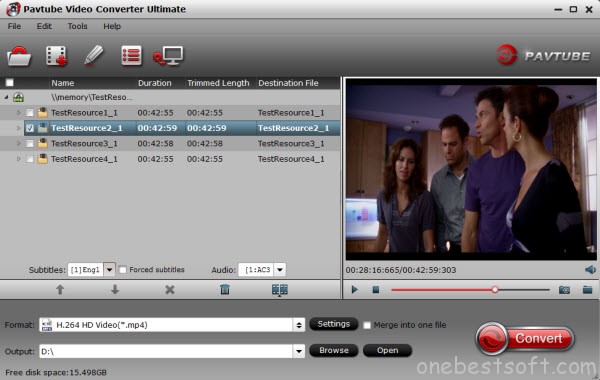
Step1: Load Blu-ray movies. 

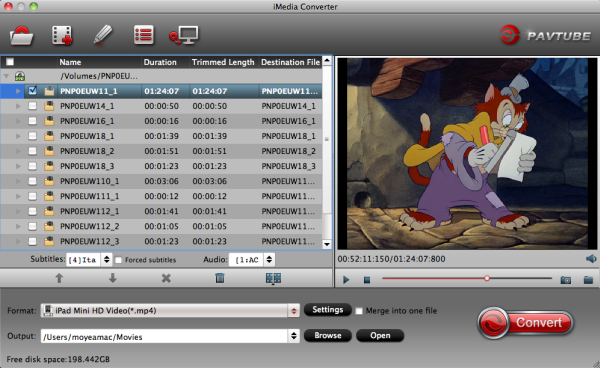
Launch the best Blu-ray to multi-track converter; import Blu-ray movies into the program. Loaded Blu-rays can be previewed in the right preview window. 


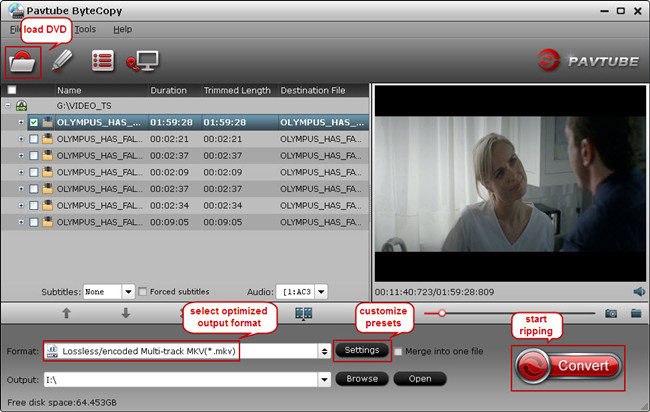
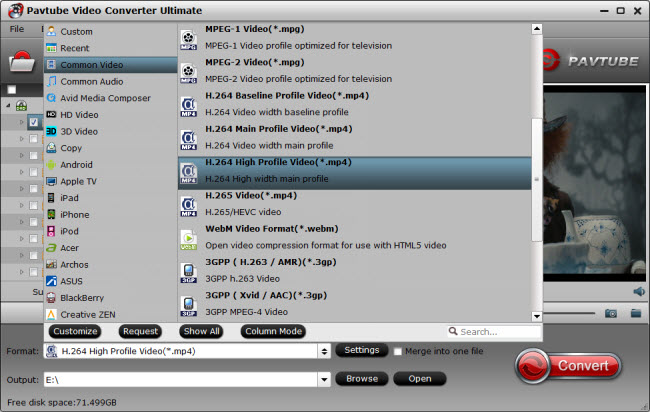
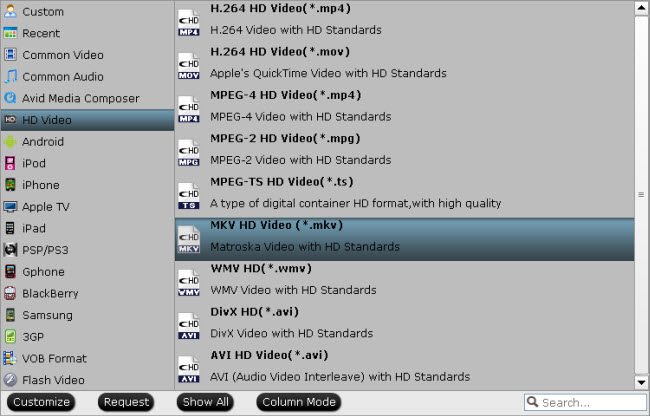
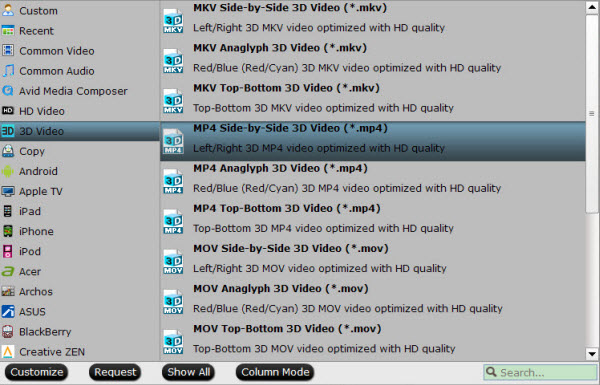
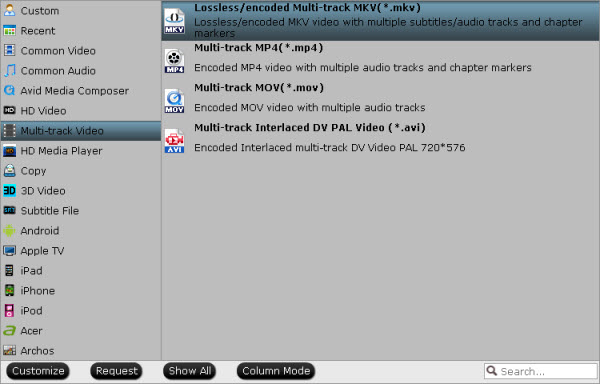
Step 2: Choose output format 

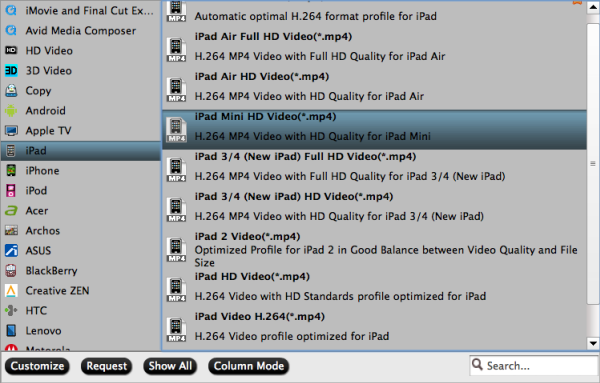
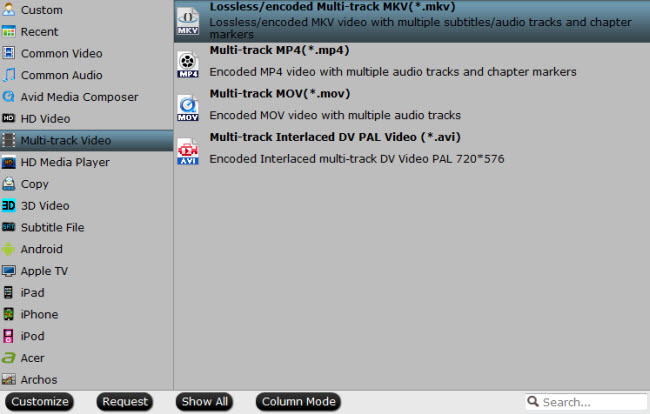
To get multiple audio tracks from Blu-ray Disc, you are recommended to choose “Multi-track Video” > “Multi-track MP4 (*.mp4)” or "Multi-track MOV(*.mov)" for output. 


If you choose "Lossless/encoded Multi-track MKV (* mkv)" under "Multi-track Video" catalogue, it means you can save multiple audio tracks, subtitles, and chapter markers from original Blu-ray/DVD in output MKV and you won't suffer any quality loss. 


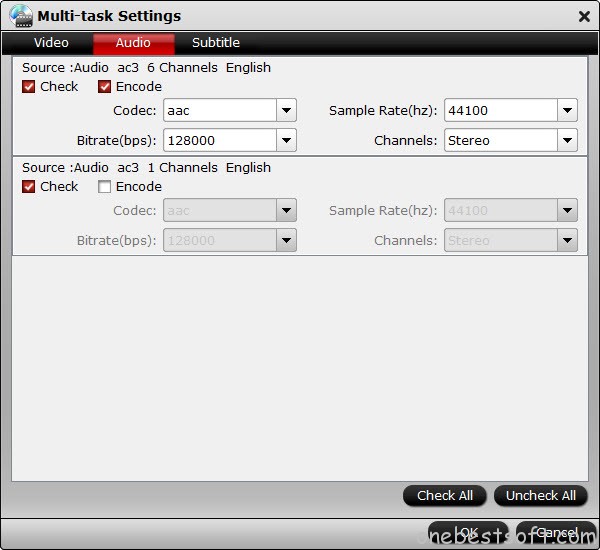
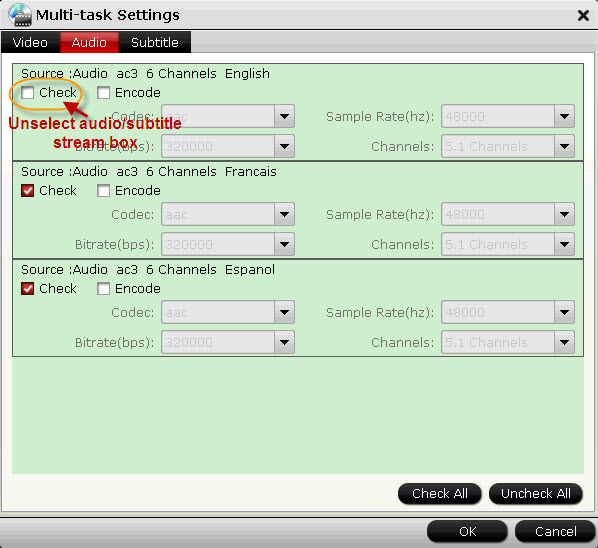
Step 3. Adjust profile settings to save both English and French audio tracks. 

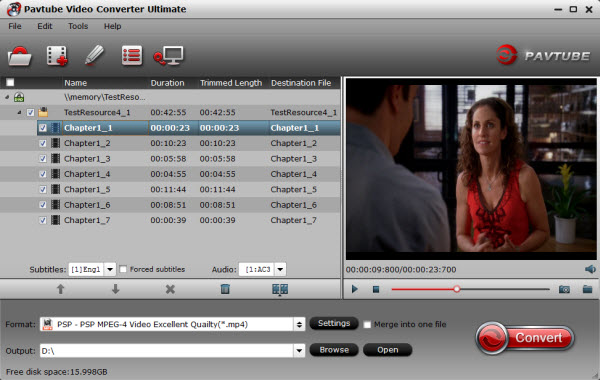
Click the “Settings” button next to Format Tab, switch to “Audio” option and unchck other audio tracks and only leave English and French audio, and save your settings. 

 
Step 4: The last step you need to do is hit the "Convert" button to start the conversion of Blu-ray content to Multi-track MKV/MP4/MOV

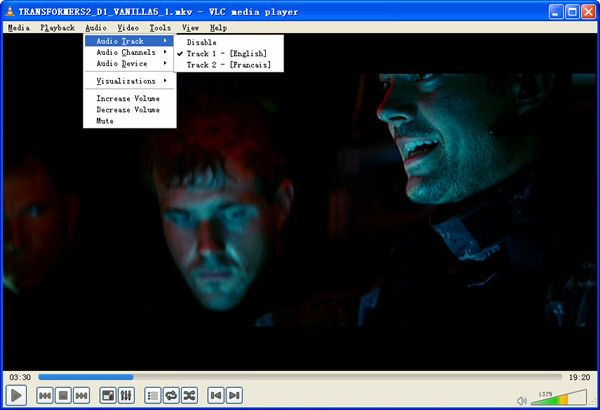
When the conversion is over, just find the folder of your output videos and open them in media player which supports audio selection such as VLC Media Player and you can enjoy the Blu-ray movie in both English and French. 

Good news for you: To save your money, Pavtube Special Offer offers various product bundles, save up o $49, such as: 


Good news for you: To save your money, Pavtube Special Offer offers various product bundles, save up o $49, such as: 


More 
Install Connect Your Galaxy Tab To A Mac Computer Using Mac Kies 
Rip 3D Blu-rays to Plex Server for playback with 5.1 channel on TV via Raspberry Pi 
Blu-ray to Galaxy - Rip Blu-ray to Play on Samsung Galaxy A8 for Freely 
M2TS to PS4 - Convert Blu-ray M2TS to PlayStation4 
ATV 3 MKV best approach-Get MKV videos to play on Apple TV 3 without problems on Mac 
Digitize your Blu-ray/DVD movies for playing on Amazon Fire TV 
Copy Movie DVDs to 25 terabyte Drobo DAS Device for backup 
Src 
Keep both English and French audio tracks

Friday, January 22, 2016

Convert MKV with DTS Audio & Subtitles to iPad Air, iPad Mini 2 and iPad series on Mac OS X 10.9 Mavericks


Summary: To get iPad Air, iPad Mini 2 and iPad series to play MKV movies with DTS Audio & Subtitles, you may have to convert MKV DTS to MP4 for iTunes and sync with iPad. This article mainly introduces the easy way on Mac OS X Mavericks. 

Most of the high quality movies are encoded with MKV files with h.264 video and dts audio, the problem to the iPad is the dts audio, which is a multi-channel audio file type used in surrounding sound. 

Need help playing MKV videos with DTS Audio & subtitles? What app can I use on Mac? 

I've tried AVPlayerHD, PlayerXtreme & Infuse. I cant find any video app in the store that will play MKV/x264 videos with DTS audio. I have to convert the DTS to AC-3 for it to play. I was able to use to Infuse tonight to play a 1080p video but I used an app to conver the DTS to AC-3 before hand. Anyone have anything that will play MKV with DTS Audio & subtitles? Btw, I'm on iPad Air. 

As above quesions, you will find you can't view MKV with DTS Audio & Subtitles on iPad Air, iPad Mini 2 and iPad series with iTunes, as the default and downloaded player on the IOS smartphone cannot find a suitable decoder for the DTS Audio. 

To play a MKV movie with dts surrounding sound on an iPad Air, iPad Mini 2 and iPad series, you will need to convert the MKV file to something that is within the iPad’s compatibility to handle, such as mp4 or mov. Here is how. 

Free Download and install the App: Pavtube iMedia Converter for Mac 


It works well in converting MKV DTS videos to iPad supported video formats. The program is easy to use and produces excellent results. Conversion speed seems fine and the converted videos look decent on iPad Air, iPad Mini 2 and iPad series as original. Just download it and follow the steps below to realize the way getting MKV mvoies with DTS Audio & Subtitle to play on iPad Air, iPad Mini 2 and iPad series smoothly. 


Step One. Add MKV videos to Mac iPad Video Converter. 

Click the "Add Video" icon to add your source mkv videos, or drag-and-drop them directly. 

 
Step Two. Choose target video format. 

Choose the iTunes supported formats in the "Format" dropdown list. You can go to "Common Video" or "HD Video" options to find what you like. I think MP4 format is better for iTunes. 

For iPad Air, choose " iPad Air Full HD Video(*.mp4) for play with iPad Air. 


For watching on iPad Mini 2, select "iPad Mini HD Video(*.mp4)" 

 
For other iPad series, choose "iPad HD Video(*.mp4)" 


Step Three. Customize video specs. (Optional) 

Click "Settings" to open profiles settings window. Here you are able to customize video size, bitrate, frame rate, sample rate(Hz)…all the specs can be fixed manually. A personal tip: the higher bitrate you choose, the better video quality will be; and you will get videos in larger size. 

Tips: DTS to AC3 5.1 Availability - Set advanced video and audio settings.
Click on "Settings" button, and the following window will pop up, which enables you to adjust video and audio parameters including codec, aspect ratio, bit rate, frame rate, sample rate, etc. Here you set Audio codec as AC3, and adjust Audio sampling rate and Bit rate to fit your player. By the way, 5.1 sound is available in "Channels". I find that bitrate higher results in big file size, and lower visible quality loss. 

Step Four. Start Conversion. 

Go ahead and click "Convert" button to get MKV with DTS Audio & Subtitle to iTunes conversion started. After a while, you can find the generated file for iTunes quickly via "Open" button. 

Now open your iTunes and then sync the converted mp4 movies to iTunes library for convenient playback on iPad Air, iPad Mini 2 and iPad series. In this way, you can enjoy your favorite MKV with DTS Audio & Subtitle on your iPad Air, iPad Mini 2 and iPad series with iTunes wherever you are.


More Tips and Solutions

1. For hard-coding MKV subtitles, just choose desired language from the drop-down box of “Subtitles”. 

2. Having trouble with MKV Audios? Refer discussions of converting MKV DTS to AC3 for solutions. 

3. If you want to watch 1080p Blu-ray, DVD movies on iPad series as well as the HD video files, you’d better choose the Mac iPad Ultimate Converter to do the conversion task saving you time and effort. 

4. Although iPad supports a wide range of video/audio formats, there’s still some format limit. If you wanna play HD videos on iPad Air, iPad Mini 2 and iPad series like MTS, M2TS, MOD, TOD, TiVo, MPG, VOB, etc smoothly, or want to rip Blu-ray, DVD discs for watching on these devices, you should convert them to iPad playable format in advance. This Mac iPad Video Converter as the excellent iMedia Converter for Mac will be your best choice. The Windows version is Video Converter Ultimate


More 
Freely Watch Halloween Blu-ray Movie on Mac/Windows 
How To Play H.265/HEVC On Roku 3/4 Without Any Hassle? 
How do I get a Samsung Galaxy Tab 3 Kids Edition to preference the SD card? 
Watch 1080p MKV/AVI/M2TS/ movies on Sony BRAVIA HDTV via USB 
Play H.265 video files on the new Apple TV 3 freely 
How to keep the original DTS HD-MA audio track from Blu-ray Disc? 
Copy Blu-ray/DVD for playing on Samsung Smart TV via usb-hard drive 
Store Blu-ray/DVD on HTPC with 5.1 audio Via Mac OS X El Capitan 


Src 
Convert MKV with DTS Audio & Subtitles to iPad Air, iPad

Thursday, January 21, 2016

Watch 3D YIFY Movies on Android Tablet or Smartphone

Would like to searching and downloading the latest YIFY movies torrents in 1080p, 720p, DVD and 3D quality. If you’re movie fans, you may know about many popular safe torrent sites, such as The Pirate Bay, Kickass, etc., but may not know about YIFY. Read this guide, you can learn how to play YIFY movies without YIFY movies offcial codecs on Android Tablet and Smartphone. 
 

In actually, you can’t directly download and play 3D YIFY movies on Android Tablet and Smartphone without YIFY Movies Official Codecs. Here a must-have video converter tool for Android is recommended to all Android Tablet and Smartphone users for converting 3D YIFY video to Android on Windows 10 with a few mouse clicks. 

Here we recommend the best tool (read reviews) – Pavtube Video Converter Ultimate to all of you which is powerful on reformatting 3D YIFY Movies to the format you want to play on portable devices, media players or edit in some software. Here we will focus on transferring 3D YIFY Movies to MP4 for Android. Another version is for Mac users. Let’s go now! 

Downloaded 3D YIFY Converter for Android: 


How to Convert 3D YIFY Movies on Android Tablet or Smartphone with best settings 

Step 1: Add 3D YIFY Downloads 

Click Add button to add 3D YIFY Movies to the program. You can also directly drag the video files into the program. And you can add multiple files to save your time for this program supports batch conversion. 


With this 3D YIFY Converter, you can also play 3D YIFY movies on iPhone/iPad

PSP on Windows 103D TVPlex and so on. 

Step 2: Set output options 

You can then select an output format and specify a directory on your computer to save the output files. If you want to convert YIFY movies for portable device and don’t know what formats your device supports, you can just select the format according to the device name. Here for Youtube or Viemo as we mentioned above, we suggest you to select the “Common Video -> H.264 High Profile Video(*.mp4)” as the nice one. 


Optional function: You can also configure the parameters like resolution, frame rate, encoder and bit rate for video, and sample rate, channel, encoder and bit rate for audio and save it as your own profile. 

Step 3: Start Conversion 

At the end, just go back to the main interface and press the “Convert” button to start the 3D YIFY movie conversion. Within a few minutes, you can get the converted video files you want by clicking the Open button. Justsync them to your Android devices, so that you can play and share anytime anywhere. 


More 

Freely Watch Halloween Blu-ray Movie on Mac/Windows 
How To Play H.265/HEVC On Roku 3/4 Without Any Hassle? 
How do I get a Samsung Galaxy Tab 3 Kids Edition to preference the SD card? 
Watch 1080p MKV/AVI/M2TS/ movies on Sony BRAVIA HDTV via USB 
Play H.265 video files on the new Apple TV 3 freely 
How to keep the original DTS HD-MA audio track from Blu-ray Disc? 
Copy Blu-ray/DVD for playing on Samsung Smart TV via usb-hard drive 
Store Blu-ray/DVD on HTPC with 5.1 audio Via Mac OS X El Capitan 


Src 
Watch 3D YIFY Movies on Android Tablet or Smartphone

Rip Blu-rays to NAS keep All Audio Tracks and Subtitles

MKV is a flexible, open standard video file format. The MKV container can include video, audio, and features such as alternate audio tracks, multilingual subtitles and chapter points. MKV offers a richer media experience than any other current format, and that’s why we chose it as the ideal file container for Blu-ray backup. If you want to copy dozens of Blu-ray movies to NAS device with all audio tracks and subtitles for DLNA streaming, you may have to convert and rip Blu-ray to NAS compatible MP4 or MKV format first. 

To achieve this goal, Pavtube ByteCopy is perfect for you. Ease of use and Very Intuitive UI and a large variety of encoding options. It can not only backup Blu-ray/DVD to MKV format in multi-track, but also convert BD/DVD to any video format you like. For Mac users, you can turn to Pavtube ByteCopy for Mac on Mac OS X El Capitan

Read more: MakeMKV vs ByteCopy vs DVDfab 
User-friendly Blu-ray Ripper: ByteCopy vs DVDfab, Which one is best? 

Firstly, this Blu-ray to MKV app can copy Blu-ray to MKV with chapter markers in 1:1 high video quality. And with NVIDIA CUDA technology (only for Windows version and in H.264 codec) and continuously upgrade, it can rip the latest Blu-ray to lossless MKV in 5.1/7.1 audio with ultra fast speed. ByteCopy Mac Version also supports to output lossless MKV with chapter markers. 

Secondly, it offers Blu-ray Full Fisc Copy with original structure including chapter markers and Directly Copy with intact Blu-ray main movies. 

Thirdly, not just lossless MKV, this Blu-ray to MKV app can virtually backup Blu-ray to any other formats, like H.265, M3U8H.264 MP4, MOV, AVI, etc. 

Fourthly, with the built-in video editing tool, you can trim video footage, crop black area, add SRT/ASS subtitles into video. What’s more, it enables you to extract FLAC/WAV audio from Blu-ray audio disc and extract SRT subtitle from Blu-ray movies. 

Free Download and trail: 


Other Download: 

- Pavtube old official address: http://www.pavtube.cn/bytecopy/ 
- Cnet Download: http://download.cnet.com/Pavtube-ByteCopy/3000-7970_4-76158512.html 

Now let me show you how to backup Blu-rays to NAS keep All Audio Tracks and Subtitles in 3 steps. 

1. Import Blu-ray/DVD to Pavtube ByteCopy. 

Click "Load file" icon on the top left to load the Blu-ray/DVD disc. Pavtube programs support batch conversion and you can merge into one file for output. If you have large collections of BD/DVD, it will be your first choice. 


2. Choose lossless MKV as output 

To preserve chapter markers, lossless multi-track MKV will be a perfect output video format. Click the format bar to follow “Multi-track Video” > “Lossless/encoded Multi-track MKV (*.mkv)” which well preserves chapter markers and multiple subtitles/audio tracks. 


Tips: Select audio codec for output. Click “Settings” button on the main interface; you are brought to Multi-task Settings. Here detailed parameters of multiple audio and subtitle tracks are listed and you can change any of them at will. In default system setting, every track is checked for lossless MKV output. If you want to remove one of them, just uncheck it from the list. 


Note: If you change audio parameters under “Encode” option, you will get a encoded multi-track MKV file, not lossless multi-track MKV. Recoding Blu-ray to MKV will take a little more time for conversion than lossless output. 

3. Start conversion. 

Click big "Convert" button to start conversion. It won't take much time for conversion and then you will get MKV video once completed. Hit "Open" button you will go to location of generated files. 

Now transfer the converted files to NAS device, and go to fully enjoy your favorite Blu-ray to NAS with multiple language and share with other friends. 

More features in ByteCopy: 

* Full Disc Copy can 1:1 backup the whole Blu-ray/DVD disc with original structure including chapter markers. 

* Directly Copy will backup 100% intact Blu-ray main movie with all the multiple tracks excluding menu. 

* Contain all the features of Blu-ray Ripper: rip and convert latest Blu-ray/DVD to various video formats for playback or editing, edit the video before conversion including trim, crop, effect, etc, add *sst and *ass subtitle into video part and so on. 

Money Saving Software Bundles are coming and it will provide big special sale on much software bundled like: 


More 

Freely Watch Halloween Blu-ray Movie on Mac/Windows 
How To Play H.265/HEVC On Roku 3/4 Without Any Hassle? 
How do I get a Samsung Galaxy Tab 3 Kids Edition to preference the SD card? 
Watch 1080p MKV/AVI/M2TS/ movies on Sony BRAVIA HDTV via USB 
Play H.265 video files on the new Apple TV 3 freely 
How to keep the original DTS HD-MA audio track from Blu-ray Disc? 
Copy Blu-ray/DVD for playing on Samsung Smart TV via usb-hard drive 
Store Blu-ray/DVD on HTPC with 5.1 audio Via Mac OS X El Capitan 

Src 
Rip Blu-rays to NAS keep All Audio Tracks and Subtitles 

Tuesday, January 19, 2016

Store Blu-ray/DVD on HTPC with 5.1 audio Via Mac OS X El Capitan

“ I have lots of Movies collections, Such as Frozen and some Halloween Blu-ray/DVD discs. I would like to Preferred format both MP4 and MKV with full DTS or 5.1 audio. Then, store movies on HTPC as part of home entertainment system. Finally, I found Pavtube through a Google search and choose ByteCopy for Mac. Because of it seemed to offer the best solution to rip DVDs and Blurays with plenty of options.” 

Below, you can learn how to backup Blu-ray/DVD to XBMC for playing on HTPC with with AC3 -5.1 sound from Mac OS X El Capitan. 

Here, A professional tool can help you out: Pavtube ByteCopy for Mac can easily directly copy your Blu-ray/DVD Collection to XBMC for playing on HTPC with friendly format (like: HD MKV) on Mac OS X El Capitan. It supports to convert Blu-ray and Blu-ray/DVD movies and all kinds of video to the support format like MP4, MKV, etc for you and backup your Blu-ray/Blu-ray/DVD without quality loss AC3 5.1 audio for HTPC Media center. What you get is a perfect 5.1 AC3 audio for smooth playback on multiple devices. You can also throw other 5.1 audio sources to it for lossless conversion. For Windows users, you can use Pavtube ByteCopy

Note: With Pavtube ByteCopy, you can also rip Blu-ray/Blu-ray/DVD to Asus O!Play Mini PlusRoku 3 etc for smoothly playback. 

Copy Blu-ray/DVD to HD MKV with AC3 -5.1 sound for playing on HTPC via Mac OS X El Capitan 


Other Download: 
- Pavtube old official address: http://www.pavtube.cn/bytecopy-mac/ 
- Cnet Download: http://download.cnet.com/Pavtube-ByteCopy/3000-7970_4-76177783.html 

Note: A external BD drive is needed for copying your Blu-ray and DVD. 

Step 1. Load the Blu-ray/DVD movies (Disc, folder, ISO) from Mac OS X El Capitan which you want to convert to the program. 


Step 2. Click "Format" and select an optional format. There are customized formats for different devices and application. Here you can choose "HD Video->>MKV HD Video(*.mkv)" for best playing on HTPC. 


Step 3. Click "Settings" button, the "Profile Settings" windows pops up, on which you need to set the audio codec to ac3. This ensures your output videos to be encoded with ac3 codec. Apart from changing audio codec, you are also allowed to reset video resolution, video bit rate, frame rate, audio bit rate and sample rate on this window. 


Step 4. Click "Conversion" icon and the Pavtube ByteCopy for Mac will do convert Blu-ray/DVD to MKV AC3 5.1 sound at fast speed. With just a click on "Open output folder", you can locate the export video quickly. 

There you have it. Pretty simple. Now you are free to get MKV AC3 5.1 sound out of your HTPC from Mac OS X El Capitan for entertainment. Have fun! 

More functions of this Top Blu-ray/DVD Copying software for Mac OS X El Capitan: 

A. If you want to backup Blu-ray and DVD without quality loss. Meanwhile, several audio tracks and subtitles are preserved so you can switch language when watching movies, you can also use the tool to rip BD/DVD to lossless mkv on Mac

B. Click "Copy the entire disc" of ByteCopy to 1:1 backup the whole Blu-ray/DVD discs with original structure including chapter markers. After accessing the Blu-ray/DVD complete backup (BDMV folder), you can follow "drive">> "BDMV">> "STREAMS" to find uncompressed M2TS streams to play in XBMC. 


More 

How to use iPhone 6 Video with FCP X in High Quality on Mac 
Backup DVD To Plex For Watching On Tablet/Laptop/Mobile 
Convert DVD ISO/IFO image files to Kindle Fire HD for playing smoothly 
Convert Video to iPad Pro/Mini 4 Supported Video Formats 
How Can You play online/downloaded YouTube video with Roku? 
Rip Blu-Ray To Plex Server To Set Up Home Theater 
Which Audio and Video Formats Are Supported by iPhone 6 
Get a Galaxy Grand/2 Video Converter to Score Yourself 


Src 
Store Blu-ray/DVD on HTPC with 5.1 audio Via Mac OS X El

Sunday, January 17, 2016

Playing 2D/3D video files with AC3 audio in Gear VR

Here is my guide to transferring and playing 2D/3D movies with AC3 audio on the Samsung Gear VR for watching everywhere. 


“ Has anyone been able to figure out how to play videos with AC3 audio inside Gear VR? When I play such (2D or 3D) videos, the video plays fine but there is no sound and I get a pop-up that the audio codec is not supported. In non-Gear VR mode, the stock video player can play such files with video only but the BS Player app can play such files just fine with both video and audio. Since most of my videos have AC3 audio, it is a real pain if I have to convert the audio every time before copying such video files from the PC to Note 4 SD card. “

I searched through several threads on the forum and after much frustration haven't found a solution to my problem yet. Fortunately, I got the best solutions and I can achieve enjoy my favorite 2D/3D video files with AC3 audio in Gear VR at everywhere. Yes, the Pavtube Video Converter Ultimate helped me out! This all-in-one Blu-ray, DVD and HD video converter. Convert latest Blu-ray and DVD to Samsung Gear VR compatible video as well as other video formats, you can also edit various video formats easily. Moreover, it allows you to do simple editing to the videos such as cropping, altering video dimension, adding special effect, and adjusting video or audio parameters and supports batch conversion.

In addition, it supports 150+ video presets for popular devices like the iPad, Android devices, game console, etc. For Mac users, get the equivalent Mac version. Just get the right version and follow the steps below to convert 2D/3D video files with AC3 audio in Gear VR.


Easily Convert 2D/3D video files with AC3 audio in Gear VR

Firstly, free download and install Pavtube 3D Video Converter for Gear VR.

Step 1: Click “Add Video” button on the main interface to load your 2D/3D Movie files to the program. (Drag & Drop function is included.)


Step 2: Set the output audio as AC3 with 5.1 channels. Click “Format > HD Video > MKV HD Video(*.mkv)” as output codec for transcoding MKV DTS to MKV AC3 or AAC with 5.1 channels. If you only want the audio, no video, please select Common Audio (*ac3) as output format.


Tip: If you just wanna rip the 2D/3D movie files to your Gear VR, you can choose the “3D Video > MP4 Side-by-Side 3D Video(*.mp4)”


Note: To learn more about the differences between Anaglyph 3D and Side-by-Side 3D, you can click the link for more info.

Step 3: Adjust conversion specs and 3D effect (Optional)

Adjust the video and audio parameters including the Bitrate of Video&Audio, Video Size, Sample Rate, Frame Rate, Audio Channels, etc., by clicking the “Settings” button on the main interface for getting the best quality.

Step 4: Start conversion for Gear VR

Now back to the main interface and hit "Convert" to start the conversion. Wait for moments till the conversion completed, then click "Open output folder" to quick locate converted SBS 3D MP4 videos, then, you can transferthe converted video files on your Samsung Gear VR for enjoy your fantastic 2D or 3D movies with 3D effects on Gear VR at anytime as you want.


More
How Can You play online/downloaded YouTube video with Roku?
Rip Blu-Ray To Plex Server To Set Up Home Theater
Which Audio and Video Formats Are Supported by iPhone 6
Get a Galaxy Grand/2 Video Converter to Score Yourself
Ripping DVD to Apple TV for playback on Onkyo receiver and Panasonic TV
Enjoy Christmas 2D/3D Blu-ray on PS4 When Staying at Home
How to View iTunes Movies via Kodi?
Top 6 Free Online/Desktop MP4 to MOV Video Converter

Src
Rip 2D and 3D Blu-ray to SBS/Top-Bottom/Anaglyph 3D MOV

Tuesday, January 12, 2016

Convert Multi-audio Channels MXF with Original Audio Tracks Preserved


How to keep multiple audio channels when converting MXF to MP4/MKV/MOV format with lossless quality? This guide provides a simple way to convert multi-track MXF to MKV/MP4/MOV file for playback and editing.


Found on multi-track MXF forum, there are following issues you may have encountered: 

“I have some MXF files from a normal Canon XF100 and want to convert them to any format that FCP adopts. The key point is I don’t want to lose any of the audio channels that I recorded with two microphones. Is that any workflow for this?” 

“I have downloaded some MXF files from the P2 Card, recorded using a Panasonic AG-HVX201AE Camera. I want to extract a small P2 MXF clip to play with QuickTime Player, is there any way to keep all my audio tracks?”


“I have some XDCAM files recorded from Sony PMW-200, when I put them onto pinnacle studios, they don’t lag. When I upload them to moviemaker however, the videos are very laggy and freezy. Is there any way to fix this? My clips have different mics on the left and right channels, so I want both audios (channels) to play at the same time.” 

From above, you can see many folks are asking how to get your editing programs and media players to work with multiple audio channels MXF files. I also have this problem but most the converting program cannot do this; they either loss one of my audio track or duplicate one of them and cover to another channel. So, to playback or edit multi audio channels MXF videos on Mac, the best way is converting MXF to program or device supported formats retaining multi audio channels. Here, Pavtube iMixMXF would be a quick answer to the questions mentioned above. You can choose to either mix the multiple audio tracks/channels into one track or repack them with all the audio channels preserved. 
 
The process of converting multi-audio channels MXF with original audio tracks preserved: 

Step 1: Download and install the iMixMXF. Launch the program and load MXF clips into it through either “Add video” button or “Add from folder” button. You can also drag and drop MXF files directly to the main interface. 


Step 2: Click the “Format” bar and select the output format you want under “Multi-track Video” catalogue. This iMixMXF can export files with multi-audio channels preserved for broadcasting, further editing, delivering and playing. 


Step 3: If you do not need all audio tracks for output, click “Settings” button you are allowed to uncheck the audio tracks you do not want for output. If you need to mix multiple audio tracks into one track, go to check “Mix into one track” on the lower left. Conversely uncheck it you will get multiple audio tracks separately. And you can choose to keep default settings or adjust parameters, like codec, bit rate, channels, etc, according to your different requirements. 


Step 4: Click the “Convert” button to start converting multi-audio channels MXF with keeping original audio tracks preserved. 

Conclusion: Find the generated files by clicking “Open” icon and you can transfer MXF footage with multiple audios for editing and playing. 


More 


How Can You play online/downloaded YouTube video with Roku? 
Review of Galaxy Tab 4: Main Specs and Video Playback Tips 
Is it possible to stream DVD via Plex to play on Smart TV? 
Sony Xperia Z3 benchmarks confirm rumored specs? 
Set Up ATV 4 for streaming HD videos with Dobly Digital 5.1 sounds 
Convert H.265/HEVC to PS4 for Samsung TV via Mac El Capitan 
Use Gear VR to watch 3D Blu-ray movies on Galaxy Note 4 
Converting YouTube FLV to iTunes friendly MP4/MOV format 

Src 
Convert MXF video with original multiple audio tracks