Tuesday, September 29, 2015

How to Play Lossless FLAC Audio Files on iTunes, iPhone, iPod, iPad?


This article will introduce a step by step guide on how to play lossless FLAC audio files on iPod, iPhone, iPad, iTunes in lossless with the help of the powerful FLAC Converter Mac or Windows app. 
Do you know FLAC audio format? Even though storing audio files in a FLAC container would take up a bit more space, as the free lossless audio codec, FLAC is favored by many audiophiles who prefer the high quality of sound. However, this audio format can not be supported by any of the apple products like iPod, iTunes, iPad, iPhone. 

Both iTunes and iOS devices support several digital audio file formats, including AAC, M4A, MP3, WAV, AIFF, and Apple Lossless. The first two are lossy, compressed formats (providing for small files), while the next two are uncompressed formats (resulting in huge files). The last, Apple Lossless, is a compressed-yet-lossless format. It falls somewhere in between in terms of file size, but doesn’t sacrifice sonic quality in the process (although debates rage about how much difference it makes). 

In order to solve "iTunes and iOS devices won't import FLAC" problem, I've tried several ways including convert FLAC to MP3/M4A format via iTunes. 

To perform this conversion, you just need a powerful FLAC Audio Converter app as assistant. Pavtube FLAC Converter is a ideal tool. It can easily convert FLAC audio files to MP3, M4A, AAC, M4R, MKA, OGG, WMA, WAV, DTS remux to play FLAC on iPhone, iPad, iTunes, iPod, Quicktime, iMovie, FCP, FCE, Windows Media Player, etc. 

More than a simple converter, this app can effortlessly let you enjoy any movie on your iPad, iPhone, and many other portable devices. Pavtube Video Converter Ultimate is an all-in-one solution to backup Blu-ray/DVD movies, convert disc content and transcode common videos. It could 1:1 backup Blu-ray/DVD movies from disc to PC hard drive for disc burning and ISO image creating. 

Being a professional video converter, it could convert Blu-ray, DVD and various videos to almost all popular and hot video and audio formats like AVI, MP4, WMV, FLV, RMVB, MPEG, 3GP, MKV, MP3, AAC, etc. Besides, it allows for video editing tools including trimming, cropping, splitting, attaching srt/ass/ssa subtitles and special effects to add more fun when watching movies and videos. 

How to convert FLAC audio files to iPhone, iPod, iPad, iTunes supported formats? 

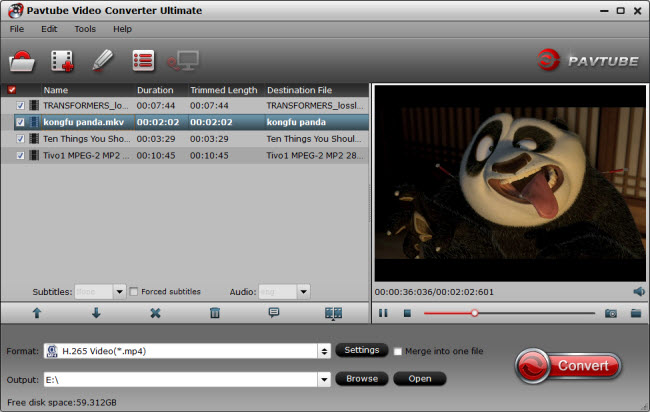
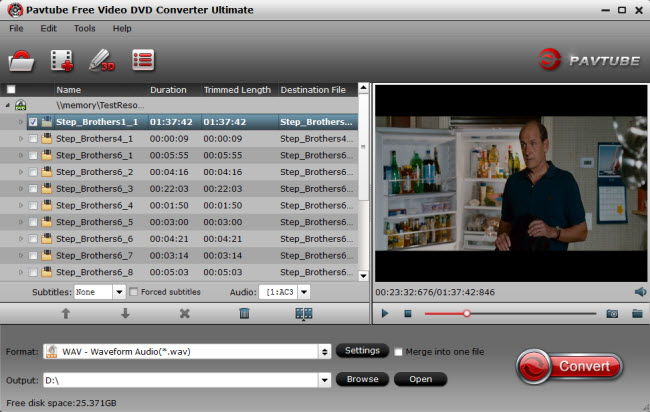
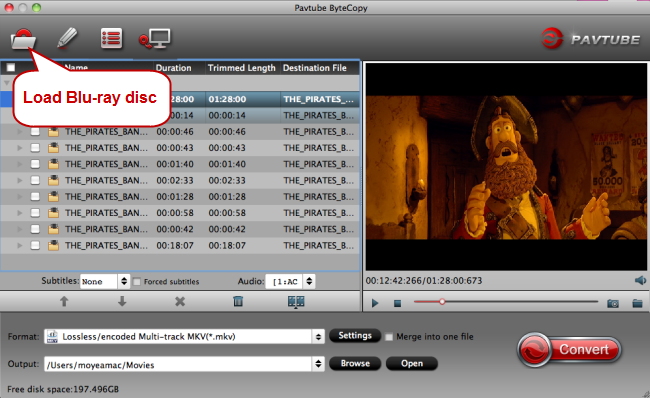
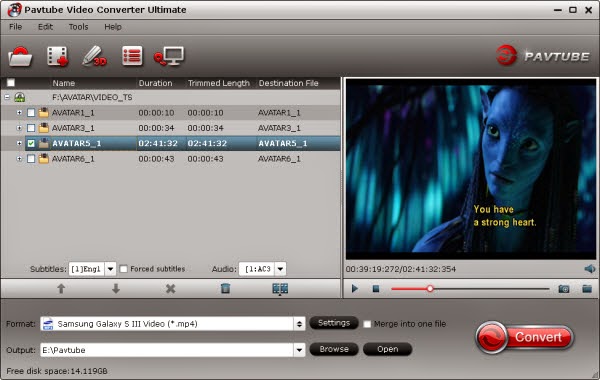
Step 1. Import FLAC files; choose format. 

Click the plus icon to import FLAC files into it, or you can drag-and-drop directly. Then you will find a horn icon on the left that indicates it's an audio file. 


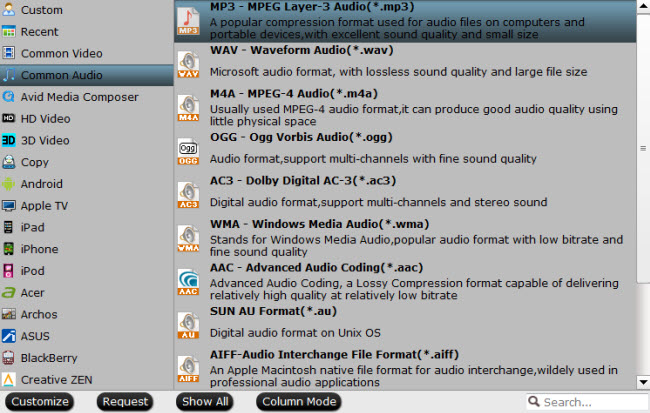
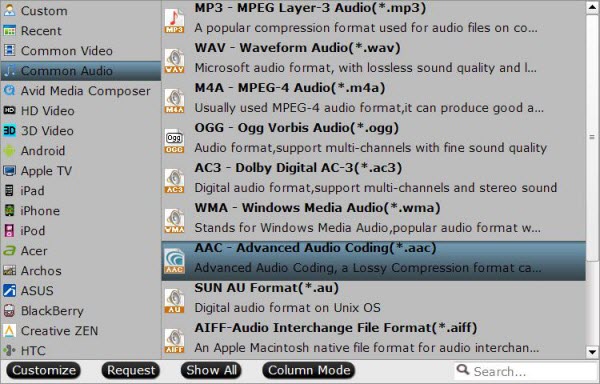
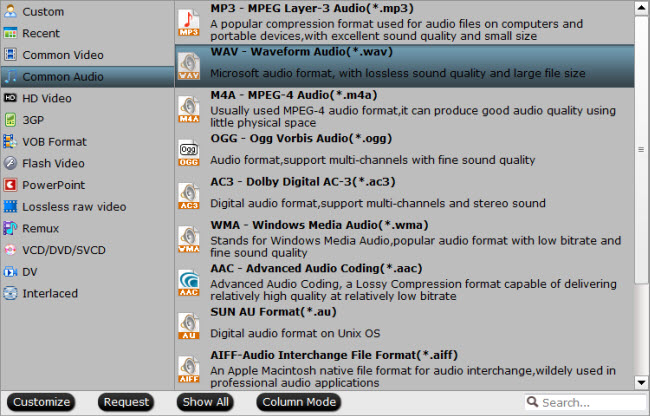
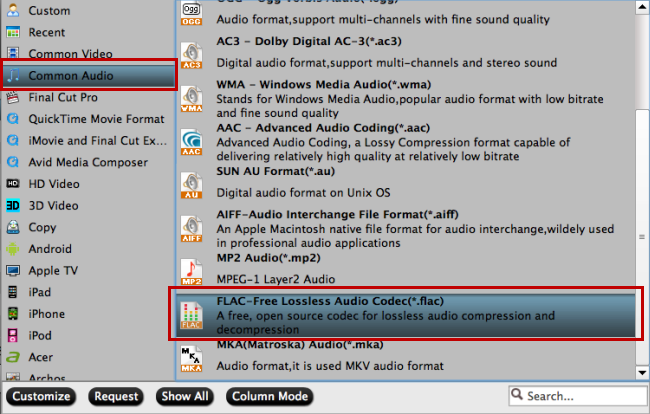
Move your cursor to Format and choose "Common Audio>MP3 – MPEG Layer-3 Audio(*.mp3)" or "M4A - MPEG-4 Audio(*.m4a)" as below: 


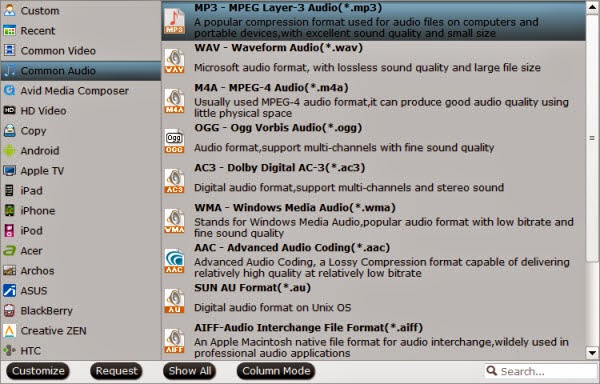
As listed above, there are several presets for other audio format; just choose one as your needs. 

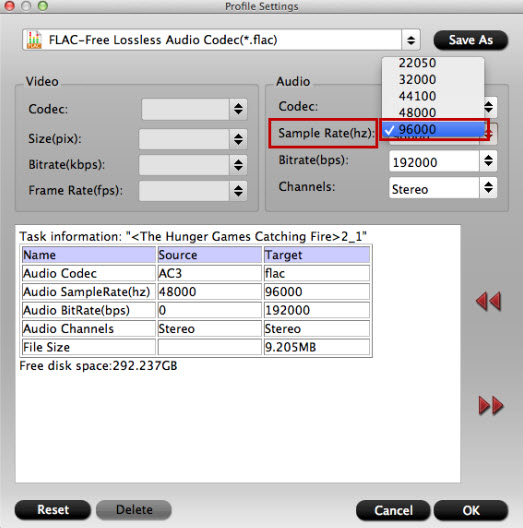
Step 2. Adjust audio specs (optional). 

If you are not satisfied with the default audio quality, just click the "Settings" icon and choose wanted audio settings including sample rate, bitrate and audio channel. 

Step 3. Start converting FLAC to MP3/M4A. 

Now back to the main interface and hit "Convert" to convert your FLAC audio files to MP3/M4A format. It will start batch conversion automatically one by one. Wait for a while during the progress; after it completed, click "Open output folder" to locate the converted audio file. 

Start iTunes, then drag and drop the converted audio file to your iTunes Music Library for syncing to iPod, uPad, iPhone for playing. 

Conclusion 

With the above software and step by step guide, Apple fans can easily enjoy lossless or lossy FLAC on iPod/iPhone/iPad on the go. Besides you can also play FLAC on iTunes/QuickTime/Windows Media Player/iMovie and more. Wait no more, just free download this powerful FLAC Converter to have a free try. 
Good News! Pavtube Release a New Site - multipelife.com with Product Migration and Name Change. Along with the new website, Pavtube has moved its bestselling software products to multipelife.com with brand new names. To thanks for your continued support all along our previous site and the new www.multipelife.com, we are holding a 'New Site Special' with fantastic discounts up to 40% off. Like us to get 20% off Video Converter Ultimate on Windows/Mac platform: https://www.facebook.com/pavtubefans/app_209569249055691 


More 

How to Start Plex on Your Side with Chromecast, iOS, Android, Apple TV, NAS? 
Compress All Kinds of Movies to Dropbox for Share 
Store collected DVD movies on my cloud storage and share with my family 
Convert HD MKV to New iPhone 6S/6S Plus for Playing 
Put DVD to Galaxy Note 5 With Unmatchable Quality 
Convert M2TS with DTS for Playback on PS3 with AC3 5.1 Surround 
Convert/Deinterlace 1080i Blu-ray on Windows/Mac 
Convert 3D Blu ray discs to a Side-by-side MKV to stream to projector via WDTV 

Convert 3D YIFY audio to MP3 on Windows 10/8.1/8/7/XP

Convert 3D YIFY audio to MP3 on Windows 10/8.1/8/7/XP 

As a movie fan, you will be familiar with 3D YIFY Torrents, sometimes you might wanna back up the episode in 3D YIFY movies like PENGUINS OF MADAGASCAR which you favor to upload the audio files to portable players for listening anywhere you go. How to realize? 


Since MP3 is supported by many audio players or devices like iPhone, iPad, PSP, BlackBerry, HTC, Xbox etc, you can feel free to enjoy 3D YIFY audio files freely by converting it to MP3. Thus you have to think what kind of 3D YIFY to MP3 Converter you need. 

When looking for a good 3D YIFY MP3 converter software, you should look for these features: 

1. High Speed 
2. Audio Quality 
3. Friendly User Interface 
4. Ability to converts different types of 3D YIFY formats 
5. Advanced functions to convert 3D YIFY to video formats 

After you find a software program with all these features, you should look to see if there is any free trial version. This way you can run the software to see if the software is right for you. Of course, most exiting thing is that you can find any free software meets your requirement. (Read Top FREE Video Converters for Windows review

After search engine, I find Pavtube Video Converter Ultimate is good one can fulfill all the above requirements. (Read review). 

With it, you will be able to extract your wanted audio from 3D YIFY torrents, a pure audio movie, a song, a conference audio, a podcast or anything else you need to carry around with you in your media player. Additionally, you can trim the 3D YIFY movie file to get your preferred audio length. You’re enabled to adjust the audio settings like Encoder, Sample Rate, Channels and Audio Bitrate as you like. Below is a simple tutorial to transcode 3D YIFY files to with audio on Windows 10/8.1/8/7/XP. 

 Convert 3D YIFY audio to MP3 on Windows 10/8.1/8/7/XP 

Step 1. Run the best 3D YIFY audio extractor, click “Add Video” to load your 3D YIFY video files. 


Step 2. Clicking the “Format” menu, here you are suggested to choose “MP3 – MPEG Layer-3 Audio(*.mp3)” from “Common Audio” for playback. Then Tick the Tick the “Output” option to select the output file for your audio file. 


Step 3. If you like, modify profile settings such as video size, bitrate, frame rate, etc to get optimized video and audio playback. 

Step 4. Now start to trim your audio length. Select the video you want to trim and click “Trim” button to open the “Edit” window. Here you can drag the slide block to decide the start time and end time. Or you can input the start time and end time in thecorresponding box as you like. 

Step 5. Return back to Video Converter Ultiamte main interface, and hit the “Convert” button to start encoding 3D YIFY video to MP3 format. In addition, batch conversion is supported. Once it finishes, open output folder, locate the created file. Connect USB cable with computer, and you can transfer them to your MP3-compatible audio players for enjoying. 

More 
How to transfer iTunes M4V videos to Kindle Fire HDX 7? 
Effective Way to Play 3D Blu-ray on Apple TV 4 
Best Way of Rip Audio/Sound/Music/Songs from YouTube 
Top 5 Finest DVD Ripper Program Review 
How to NEL Editing DVD Files with Apple ProRes 422 on Windows 10/8.1/8/7 
How to rip Blu-ray ISO image files to H.265/HEVC MKV for playing 
View Blu-ray on Sony Xperia Z5 for Unlimited Playback 
3D Blu-ray to ATV 4 - Stream 3D Blu-ray to Apple TV 4 
Src 
Extract audio from 3D YIFY Movies on Windows 10/8.1/8/7 

Monday, September 28, 2015

Best Way of Rip Audio/Sound/Music/Songs from YouTube

YouTube is an amazing source of good music with the third-ranking site on the web and is the most popular online video sharing website around the world. Due to its popularity people also started uploading music to YouTube. There are many different solutions and methods for downloading files from YouTube but what if you just want rip audio from YouTube. With Pavtube Top Audio Converter for Youtube, you can easily rip YouTube audio as your ringtone or for playback on iPod, Zune or MP3 player? 
 

Resorting to Google for help, you may easily find out various methods concerning downloading SD or HD videos from YouTube. But as for ripping audio from YouTube, there is scarcely easy yet effective solutions provided. In such case, it's seemingly of necessity to illustrate you need the Top Audio Converter for Youtube to extract audio from YouTube with the top audio quality kept. Here is review

Since it's regarded as the unrivaled YouTube audio extractor to flawlessly rip YouTube audio to MP3, iPhone Ringtone, ACC, AC3, WMA, WAV, etc. with nary audio data loss. Thus, you can play back the audio files on your iPhone iPad iPod, Android, Microsoft and Sony portable devices with the sheer sound quality as you wish. 

Tutorial on How to Rip Audio from YouTube with Best Sound Quality on Windows 

Below is a step by step guide to use this Top Audio Ripper for Windows. Pavtube Video Converter Ultimate has a well optimized interface. Even to a beginner, you will quickly know how to master this application. Please read the 5 steps below. If you are looking for a Audio Ripper for Mac, please click Pavtube iMedia Converter for Mac

Step 1: Import YouTube Video. 

After free downloading this stunning This Top YouTube audio extractor on PC, launch it. And then you can load the downloaded YouTube video you want to rip. It supports batch conversion, you can import and transcode multiple audios files at one time. 


Step 2: Choose the Output Audio Format. 

Select the audio format you need from the ready-to-use profile. You can choose to rip YouTube audio to MP3, AAC, iPhone Ringtone, etc. with up to 14 popular audio formats offered for you. 


Step 3: Merge audio files into one. 

Select the audio files you want to join together and then tick “Merge into one file” on the main interface to combine separate audio files into one. 

Step 4: Convert audio from Youtube. 

Start the conversion process by hitting the right-bottom “Convert” button to convert Youtube Audio to FLAC, OGG, WMA, AAC, APE, RAM, etc conversion begins. When it completes, now you can enjoy the Youtube audio files at anywhere when you workout! 

More 
How to Play Blu-ray via Apple TV on Large Screen 
Top 5 Finest DVD Ripper Program Review 
Upload DVD to Dropbox 
Transfer iTunes Movies to Dropbox for playing at Anywhere 
Upload Canon XC10 XF-AVC 4K MXF to YouTube/Vimeo/Facebook 
Convert HD Videos to H.265 MKV for Playing on Windows 
Can’t Play MKV, AVI, MP4, FLV, WMV, MPG, MOV by Chromecast 
Rip DVD to MPEG-2 for Importing to Premiere Pro CC 

Src 
Best Way of Rip Audio/Sound/Music/Songs from YouTube

Friday, September 25, 2015

Top 5 Best Free FLV to WAV Converters


In this article, I will show you the top 5 free FLV to WAV converter, choose the best one to help you achieve the FLV to WAV conversion process. 


FLV is one of the most popular Flash video formats, you may get this format from the Youtube/DailyMotion downloaded videos. While, WAV is a commonly used audio file format. Then how to free extract an audio track from FLV files and convert it to the WAV audio format. Many converters can do this, and some of them also provide support for converting to other media file formats, but which is best. To help you make the choice between the best FLV to WAV converters, we have compiled a list of the top five free converters out there that you can use right away. 


1. Free Video DVD Converter Ultimate (Windows) 


Pavtube Video DVD Converter Ultimate is a DVD ripper and video converter in one program. 

This is the special giveaway version of Pavtube Video DVD Converter Ultimate. According to Pavtube, the giveaway version has all the features of regular Pavtube DVD Converter Ultimate except it cannot output as MP4 nor does it have specific output profiles for electronic devices. Also be sure to check our Active Sales list for more free and cheap software! Limited time offer! Sale ends in Feb. 10, 2014. 


Key Features
  • Convert any video (including Tivo) and DVD to MOV, MKV, MPG, AVI, etc.
  • Support adding SRT,ASS,SSA sbutitles
  • You can do some simple editor: Trim, Corp, Add Watemark, (3D) Effect, Deinterlacing, Audio Editor.


After upgrade to full version, you can get more desired profiles for editing or playback. The Mac users can try iMedia Converter for Mac


2. Freemake Video Converter (Windows) 

Supporting over 200 input formats, you can convert video free to AVI, MP4, WMV, MKV, 3GP, DVD, MP3, iPad, iPhone, PSP, Android phones, encode Video to MP3 with one click, rip & burn DVD, and convert YouTube to MP4, AVI, etc. with it. All you need to do is to paste the URL straight into the software and turn your videos into the format you require in seconds. 


3. Free MP4 Video Converter (Mac) 

DVDVideoSoft is an independent developer of multimedia software programs for video, audio, photo and image processing. This contains lots of free software to download. Ranging from FLV to WAV converter, YouTube to DVD converter, Video to MP3 converter and an FLV to WAV converter. These are all free applications that are great alternatives to the paid ones. This video converter is reliable and safe, suitable for the conversion of video and audio files and burning them to CDs. 


4. Koyote Free Video Converter (Windows, Mac) 

Free Video Converter is a simple and friendly App for converting your videos into different formats, with a clean and easy to navigate GUI making it one of the most popular conversion tools around. 

Manipulate your video and audio into just about any format, quality rating, and size in just a few seconds. You can turn just about any file to play on any format or device. Matched with its great user interface, you have an excellent free video and audio converter here which can be utilized and mastered in just a few hours. You can edit and moderate your videos and choose your language from the many languages we support to personalize Free Video Converter. 


5. Clip Converter (Online Converter) 

Clip Converter is a free online media conversion application, which allows you to reocord, convert and download nearly any audio or video URL to common formats. Currently supported services: Direct Download, YouTube (HQ and HD), Dailymotion (HQ) and many more. This free and fast converter allows you to watch your favorite YouTube videos on your cell phone, PSP, iPhone or nearly any other device.

Its main feature lies in that you can set the beginning and end of your video to be converted. It means that it supports converting a part of the mts instead of the whole video file. 

 
Having viewed the five listed functional and easy-to- use free video and audio conversion tools, do you have your own choice? Do you think they actually outperform some of the expensive premium conversion tools out there on the market? Now get the best one to perform your perfect FLV to WAV conversion with fast speed and high video quality!

More 
Cast DVD Movie to Chromecast through Plex Media Server 
Encode/Decode H.265 Files to PS4 for Playing 
Play 4K UHD Videos on 4K HD TV for 4K HD Experience 
Upload Canon XC10 XF-AVC 4K MXF to YouTube/Vimeo/Facebook 
Backup Top 10 3D Movies on Blu-ray/DVD for Watching 
Watch DVD on TV without DVD Player 
Convert HD Videos to H.265 MKV for Playing on Windows 
Transfer iTunes Movies to Dropbox for playing at Anywhere 

Src 
Top 5 Best Free FLV to WAV Converters

Thursday, September 24, 2015

Best Software for ripping Blu-ray Audio to FLAC on Mac OS X

Q: “Which is the best software for ripping Blu-ray Audio to FLAC on Mac OS X? I recently bought a Blu-ray audio of Tears for Fears release "The Hurting", and unlike some titles it didn't come with a free download for playing on my iPod, so I was wondering if anyone could recommend a good software that will allow me to convert the songs via my BD-Rom to FLAC or 320 MP3's. I'd prefer it be fairly simple to use, if anything like that exists out there.” 


Free Lossless Audio Codec, more commonly referred to as FLAC, is an audio format compressed without any loss in quality. It is basically a Blu-ray disc encoded as 24-bit/96kHzor 24-bit/192kHz audio recording in three lossless formats: PCM, Dolby TrueHD, and DTS-HD Master. Want to listen the audio of the Blu-Ray movies on your portable players from Mac? You can extract the audio from the Blu-Ray disc, and convert Blu-Ray to audio MP3, 320kbps MP3, AC3 5.1, AAC, even lossless FLAC, WAV, AIFF, ALAC. 

To extract Blu-ray discs to any devices accepted FLAC audio files on Mac, you could use Pavtube ByteCopy for Mac which is an effective Mac Blu-ray Audio converter and extractor that could convert Blu-ray music to lossless FLAC audio format. still delivering an ultra-high quality listening experience on iMac or Macbook. Read the review.  
  
Now, Free Download this Top Blu-ray Audio to FLAC Ripper for Mac: 


This guide would show you detailed steps on how to convert a pure audio Blu-ray Audio to FLAC audio files on Mac.

Step 1: Install and launch the Mac Blu-ray Audio to FLAC Ripper(Windows version: Pavtube ByteCopy ); import your Blu-ray Disc or Backup saved on hard drive by clicking “Load File” icon. You can also convert a pure audio Blu-ray to FLAC/MP3 audio files for iPhone/iPad on Mac. 


Step 2. Choose Lossless FLAC audio format. Here click the format bar to follow “Common Audio” and “FLAC-Free Lossless Audio Codec (*.flac).” as the output format. 

Output Audio Format: WMA (with 7.1 channels), AAC (with 5.1 channels), AC3 (with 5.1 channels), MKA (with 5.1 channels), MP3, WAV, M4A, OGG, WMA, AU, AIFF, MP2, FLAC


Step 3. Change pure audio Blu-ray sample rate

If the sample rate of your pure audio Blu-ray disc is 96khz, and you want to keep it, just click the button “Settings” near the format bar to change sample rate to “96000”.  


Step 4. Convert pure audio Blu-ray to lossless FLAC

Click the red button on bottom-right corner to realize conversion from high fidelity pure audio Blu-ray to lossless FLAC. After completing conversion from high fidelity pure audio Blu-ray to lossless FLAC, you can experience the converted pure audio Blu-ray on your Mac OS X with Hi-res audio quality. 

More Functions about this Top Blu-ray Audio Ripper for Mac: 

The best Mac Blu-ray Copy is capable of 1:1 copying BD/DVD Disc content to local computer or external hard drive in original file structure with all subtitle tracks and audio streams preserved. Pavtube ByteCopy for Mac also supports backing up only movie content without extras to save time and storage space.

Meanwhile, it can convert latest Blu-ray and DVD movies to any other formats like MP4, MOV , M4V, AVI, WMV, MPG, MKV, etc or MP4/MOV with multi-track audios for playback and it is also able to encode Blu-ray movies and DVDs to MKV container format with preserving chapter markers, multiple audio tracks and subtitles. 


More 
Top 5 Great and Free QuickTime Alternative to Play Any Video Flawlessly 
How to Play Blu-ray via Apple TV on Large Screen 
How to Copy DVD to iPhone 6S Easily and Fast? 
How to Move Your iTunes Movies to External Hard Drive? 
Handbrake No Title Found Issue When Ripping DVD, Solved! 
Backup Blu-ray to Samsung Galaxy Tab S2 
How to upload over 500 DVDs to Seagate Wireless Plus 
Mediacoder Alternative Review: Convert Video/Audio in Windows 8.1/8 
Src 
Best Software for ripping Blu-ray Audio to FLAC on Mac OS X

Wednesday, September 23, 2015

Full disc copy Blu-ray with keeping 7.1 audio

Full disc copy Blu-ray with keeping 7.1 audio

As you know, Blu-ray comes with lossless audio quality. You are definitely love Blu-ray audio with the high quality sound experience. There are mainly three lossless audio codecs used in Blu-ray disc: PCM, Dolby TrueHD and DTS-HD MA. And the Dolby TrueHD technology and DTS-HD Master Audio can deliver unprecedented home theater experience, so there may be no one willing to loose the wonderful audio while backup a Blu-ray movie. If you have collected lots of original BD disc and want to keep the Dolby TrueHD 7.1 audio from Blu-ray discs. Here we will give you an easy fix. 
The thing is that most Blu-ray rippers in the market can not recognize the two stunning audios at all, and this may be the probable thing that troubles you a lot. With luck, Pavtube ByteCopy is here for you, which is able to read TureHD audio and DTS Master Audio, and output them as 7.1 channels. (Read ByteCopy review).Here, Pavtube offers three ways for keeping 7.1 audio channels, one is Full disc copy, another is directly copy, third is that convert blu-ray to lossless mkv with Dolby TrueHD 7.1 audio from Blu-ray discs.

The top Blu-ray Copying tool is able to read TureHD audio and output 7.1 TrueHD passthrough. It supports convert Bluy-ray (with Dolby TrueHD 7.1) to a common video with TrueHD 7.1 audio pass through as you want and even lossless Blu-ray to MKV conversion keeping the original audio tracks, chapter info and subtitles without to do any parameter settings. Mac version is Pavtube ByteCopy for Mac. Below we take the example how to using the Pavtube ByteCopy to convert Blu-ray with TrueHD 7.1 audio.

Full Disc Copy Blu-ray with keeping 7.1 audio using Top Blu-ray Copying tool
 
Step 1. Add Blu-ray movies

Insert Blu-ray Disc into your external or internal BD drive and launch the Blu-ray Ripping program. Click “disc” button to import Blu-ray movies for converting/copying.


Step 2. Choose an output folder

Click "Browse" button to select a destination folder for the output files.
Step 3. Decide Blu-ray Copy Mode for keeping 7.1 audio

Full Disc Copy Mode: Copy Disney Blu-ray Disc to a full Blu-ray folder containing all the content in original BD.  

As soon as the copying task finished, you can click "Open" button to locate the Blu-ray directory. The decrypted Blu-ray folder contains all information and contents in the original disc. Among them, the BDMV folder is the most important one with audio and video files in it. Open BDMV -> STREAM folder and you will find all the .m2ts movie clips. 

Tip: To keep TrueHD 7.1 audio, you can also choose “Common Video > WMV3(WMV9)(*.wmv)” as the output format, for it provides the 7.1 audio channels for you. But make sure the original BD disc does contain Dolby TrueHD audio, otherwise you still can’t get Dolby TrueHD 7.1 audio saved. 
  
Note: Make sure the original BD disc does contain Dolby TrueHD audio, otherwise you still can't get Dolby TrueHD 7.1 audio saved. 

Step 4. Play Blu-ray files on PC.
After the copy completed, you may click ‘Open’ buttonto locate the Blu-ray directory. Open BDMV-> STREAM folder and you will find all the m2ts movie clips. For playing the m2ts files, you may use VLC player orKMPlayer.

That’s it! Your Blu-ray video will now be encoded and a few hours later you will have a great high definition video file with preferred audio and subtitles using Pavtube ByteCopy with No Error. Have Fun!  

Read More:

Tuesday, September 22, 2015

No 5.1 Dolby Audio When Connecting Apple TV to Surround Sound System? Solved!

We recently purchased an Apple TV to stream movies from the laptop to the television in the lounge. Of course we were hoping for surround sound but only ever seemed able to get 2 channel audio. Very frustrating to say the least! So, we jumped on Google (as you do) and did some research, which wasn’t very hopeful as this seems a problem with many users. 

We have a nice flash new 3D Panasonic TV, hooked into a Denon Surround Sound System. Input from the apple TV goes into the amp via an HDMI cable, same for the blue ray etc. There’s an HDMI output cable from the amp which sends the picture to the TV. This setup worked perfectly for the blue ray player, surround sound and 3D movies. For the apple TV. Well, don’t get me started! We started by using airplay to send the laptop screen (Macbook Pro) to the television. Worked a treat for the pictures, but audio was only ever 2 channel. All the settings to change this to anything other than 2 channel greyed out. (again, a common occurrence on the forums). 

The almighty Google says “5.1 audio will only play from iTunes not airplay”. So, we diligently copy the mp4 movies into iTunes and play it on the apple TV that way. Brilliant image, lovely 2 channel audio. 

Back to Google searching and reading through forums with many people having the exact same complaints. Suggestions ranging from give up to using fibre optic audio cables being the solution, which btw made no difference. Then I came across a post that said that the apple TV is very VERY fussy on the audio format that it’ll convert to 5.1 and if anything in that formatting’s not to its liking you’re going to have 2 channel audio. 

I wonder, so I fired up Pavtube, and selected the mp4 movie (6 channel audio) to be converted to Apple TV2/3 720p Dolby Digital Pass-through(*.m4v). Wait a very short period of time as your conversion program is quite zippy. Toss the m4v file into my iTunes videos and open it up on the Apple TV… OH YEAH!!! Works perfectly in surround sound. Not only that, but if you convert SBS (3D Side By Side video’s), they work and play in 3D perfectly with surround sound. 

We’re now very happy with our Apple TV playing downloaded movies (of course we bought them in 5.1 surround after we run them through Pavtube. 

It seems to be quite a common problem that there is no 5.1 surround sound when connecting Apple TV to the surround sound system. Well, Pavtube iMedia Converter for Mac can help you get 5.1 surround sound from Apple TV by converting your movies and videos with 6 channel audio to Apple TV supported video format M4V while still remain the 5.1 surround sound. 


To get tips for playing 5.1 surround sound via Apple TV with Pavtube iMedia Converter, please click here to learn more.


Src 
Can not get Apple TV to output 5.1 Dolby audio? 

Monday, September 21, 2015

How to Extract the WAV Tracks from Blu-ray or DVD-Audio discs?

How to Extract the WAV Tracks from Blu-ray or DVD-Audio discs? 

Looking for a hassle way to extract the WAV tracks from Blu-ray or DVD-Audio discs on Windows/Mac? This tutorial will guiding you to solve these problems. 

Q: “ How to extract the WAV tracks from Blu-ray or DVD-Audio discs? I would like to find a way to rip the WAV tracks (LPCM 2.0, 192kHz, 24-bit) from a Blu-ray Audio or a DVD-Audio disc using Linux. (Once extracted, it should then be a breeze to encode the audio tracks into FLAC.) Taking the TrondheimSolistene: Divertimenti Blu-ray disc as an example, how do you extract the WAV tracks?” 

Have you ever met this problem? Do you want to find the way to extract the WAV tracks from Blu-ray or DVD-Audio discs on Windows/Mac? Wanna listening the audio of the Blu-Ray movies on your portable players? You can extract the WAV tracks from Blu-ray or DVD-Audio discs, and convert Blu-ray/DVD to lossless FLAC for playback using VLC on Mac. 

Output Audio Format: WMA (with 7.1 channels), AAC (with 5.1 channels), AC3 (with 5.1 channels), MKA (with 5.1 channels), MP3, WAV, M4A, OGG, WMA, AU, AIFF, MP2, FLAC 

 
Top Blu-ray/DVD Audio to FLAC Ripper to Convert Blu-ray/DVD Audio discs to FLAC audio files on Mac 

To extract Blu-ray/DVD discs to FLAC audio files on Mac, you could use Pavtube ByteCopy for Mac which is an effective Mac Blu-ray/DVD Audio Converter that could Convert Blu-ray/DVD music to lossless FLAC audio format. Still delivering an ultra-high quality listening experience on Mac. Even encoding Blu-ray to H.265 MP4 is supported. Read the review

  
Hot News for all Mac users! Pavtube Studio has launched a user-requested upgrade for all its Mac BD/DVD and package tools: DVDAid for Mac, BDMagic for Mac, ByteCopy for Mac, iMedia Converter for Mac to version 4.8.5.1, which focuses on the addition of the H.265 encoders and decoders. 

Note: This guide below uses Mac OS X screenshots to show you how to finish the conversion easily. The way to extract Blu-ray/DVD discs to FLAC audio files on Windows 10 is the same, just get the Windows app Pavtube ByteCopy. Read Mac OS X 10.10 Yosemite VS Windows 10

Step 1: Install and launch the Mac Blu-ray/DVD Audio to FLAC Ripper; import your Blu-ray Disc or Backup saved on hard drive by clicking “Load File” icon. You can also convert a pure audio Blu-ray/DVD to FLAC/MP3 audio files for iPhone/iPad on Mac. 


Step 2. Choose Lossless FLAC audio format. Here click the format bar to follow “Common Audio” and “FLAC-Free Lossless Audio Codec (*.flac).” as the output format. 


Step 3. Convert pure audio Blu-ray/DVD to lossless FLAC 

Click the red button on bottom-right corner to realize conversion from high fidelity pure audio Blu-ray/DVD to lossless FLAC for VLC. After completing conversion from high fidelity pure audio Blu-ray/DVD to lossless FLAC, you can streaming the converted pure audio Blu-ray/DVD to FLAC with Hi-res audio quality. 

In addition, Pavtube ByteCopy for Mac can convert latest Blu-ray and DVD movies to any other formats like MP4, MOV , M4V, AVI, WMV, MPG, MKV, etc or MP4/MOV with multi-track audios for playback and it is also able to encode Blu-ray movies and DVDs to MKV container format with preserving chapter markers, multiple audio tracks and subtitles. 

Related Articles: 

Src: 
How to Extract the WAV Tracks from Blu-ray or DVD-Audio discs?