Sunday, January 17, 2016

Playing 2D/3D video files with AC3 audio in Gear VR

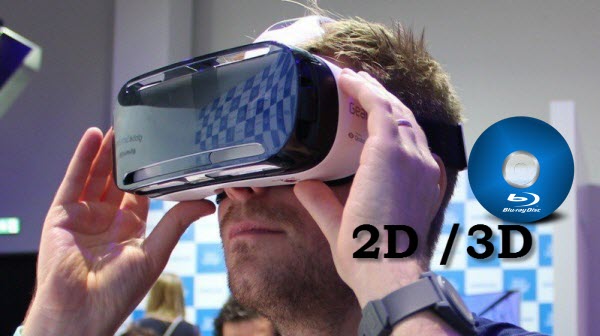
Here is my guide to transferring and playing 2D/3D movies with AC3 audio on the Samsung Gear VR for watching everywhere. 


“ Has anyone been able to figure out how to play videos with AC3 audio inside Gear VR? When I play such (2D or 3D) videos, the video plays fine but there is no sound and I get a pop-up that the audio codec is not supported. In non-Gear VR mode, the stock video player can play such files with video only but the BS Player app can play such files just fine with both video and audio. Since most of my videos have AC3 audio, it is a real pain if I have to convert the audio every time before copying such video files from the PC to Note 4 SD card. “

I searched through several threads on the forum and after much frustration haven't found a solution to my problem yet. Fortunately, I got the best solutions and I can achieve enjoy my favorite 2D/3D video files with AC3 audio in Gear VR at everywhere. Yes, the Pavtube Video Converter Ultimate helped me out! This all-in-one Blu-ray, DVD and HD video converter. Convert latest Blu-ray and DVD to Samsung Gear VR compatible video as well as other video formats, you can also edit various video formats easily. Moreover, it allows you to do simple editing to the videos such as cropping, altering video dimension, adding special effect, and adjusting video or audio parameters and supports batch conversion.

In addition, it supports 150+ video presets for popular devices like the iPad, Android devices, game console, etc. For Mac users, get the equivalent Mac version. Just get the right version and follow the steps below to convert 2D/3D video files with AC3 audio in Gear VR.


Easily Convert 2D/3D video files with AC3 audio in Gear VR

Firstly, free download and install Pavtube 3D Video Converter for Gear VR.

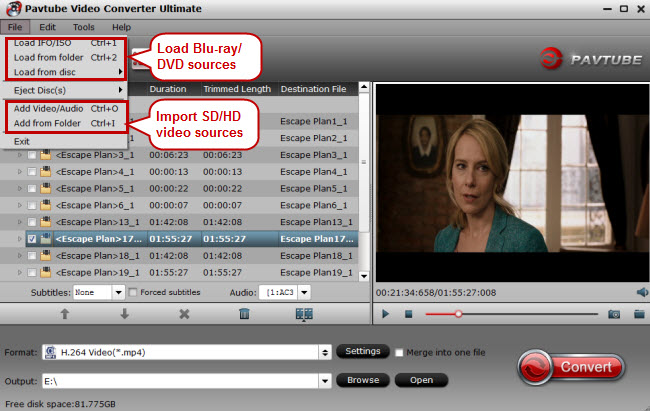
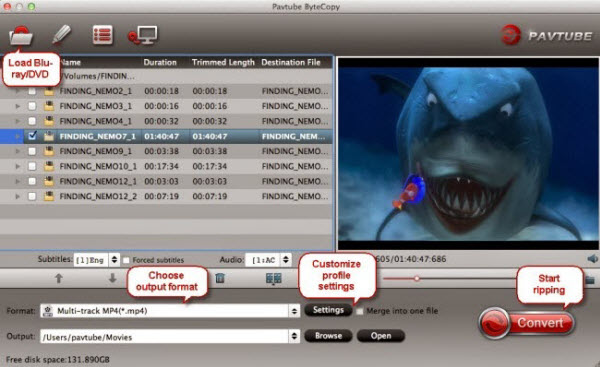
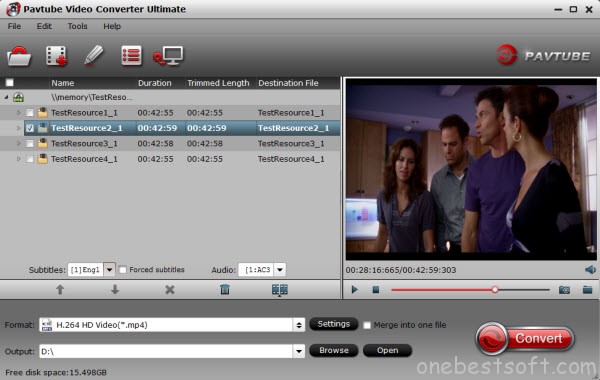
Step 1: Click “Add Video” button on the main interface to load your 2D/3D Movie files to the program. (Drag & Drop function is included.)


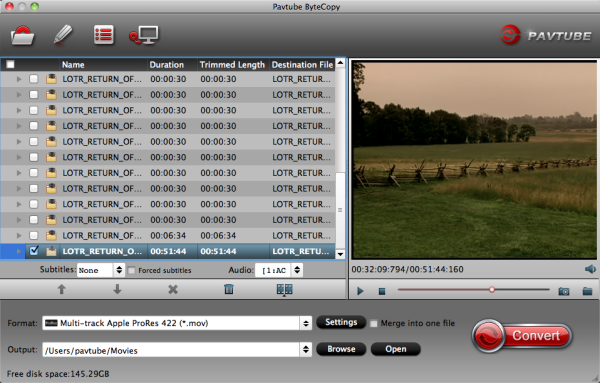
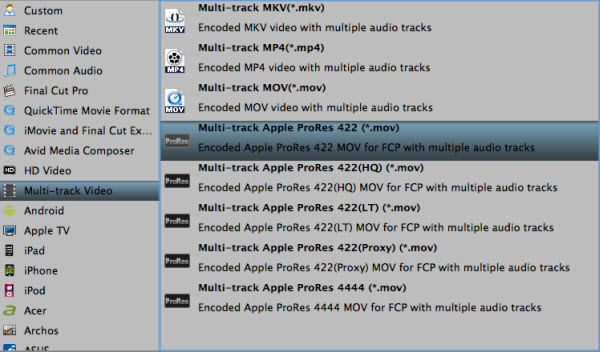
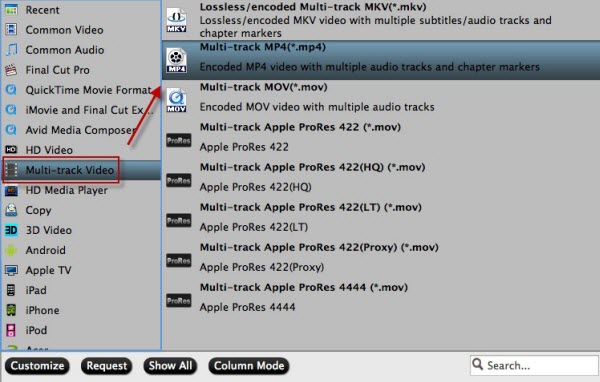
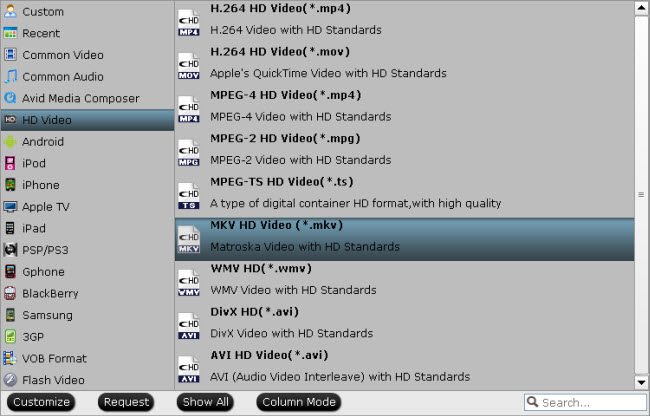
Step 2: Set the output audio as AC3 with 5.1 channels. Click “Format > HD Video > MKV HD Video(*.mkv)” as output codec for transcoding MKV DTS to MKV AC3 or AAC with 5.1 channels. If you only want the audio, no video, please select Common Audio (*ac3) as output format.


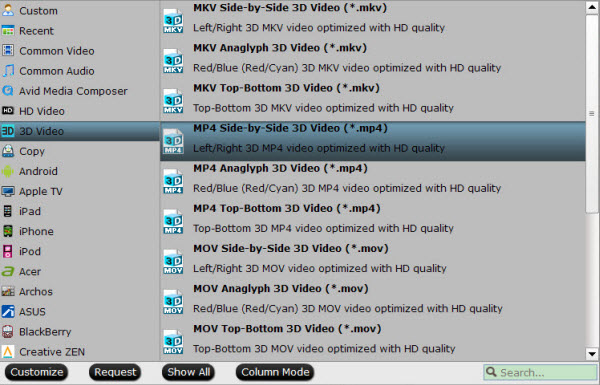
Tip: If you just wanna rip the 2D/3D movie files to your Gear VR, you can choose the “3D Video > MP4 Side-by-Side 3D Video(*.mp4)”


Note: To learn more about the differences between Anaglyph 3D and Side-by-Side 3D, you can click the link for more info.

Step 3: Adjust conversion specs and 3D effect (Optional)

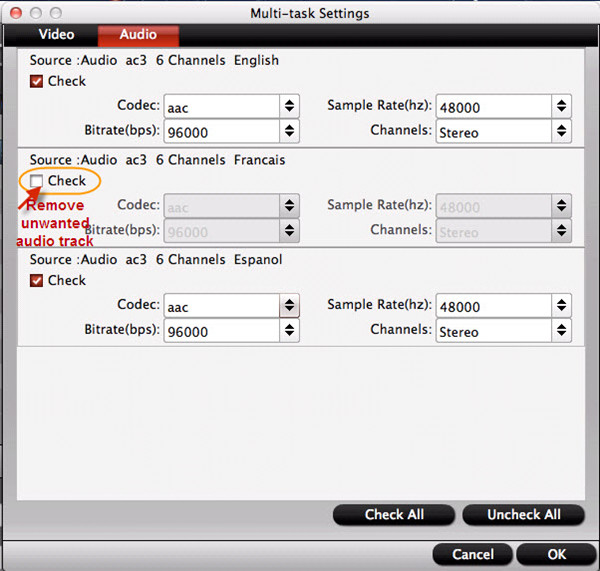
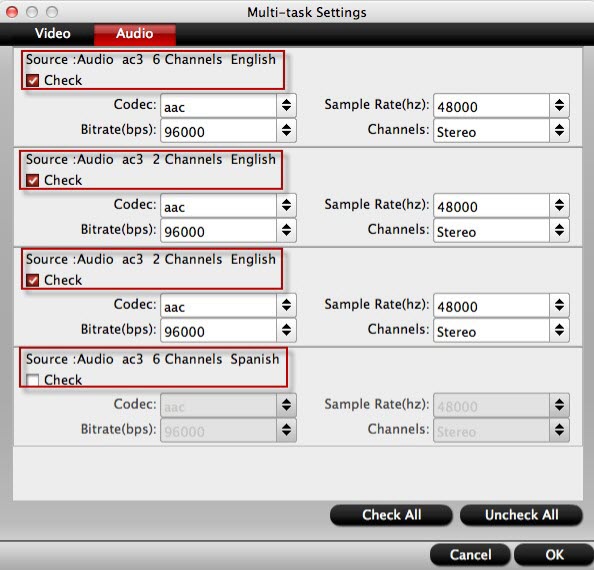
Adjust the video and audio parameters including the Bitrate of Video&Audio, Video Size, Sample Rate, Frame Rate, Audio Channels, etc., by clicking the “Settings” button on the main interface for getting the best quality.

Step 4: Start conversion for Gear VR

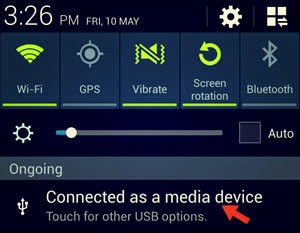
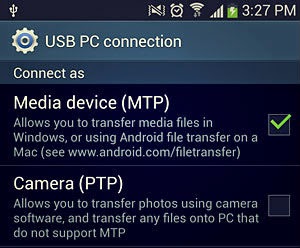
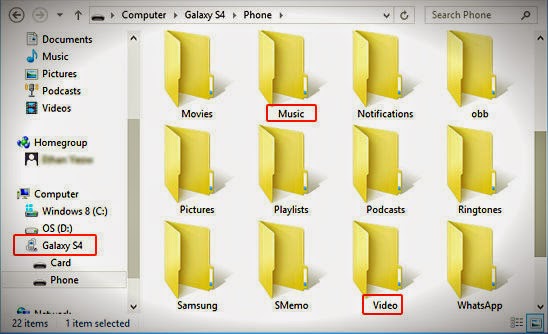
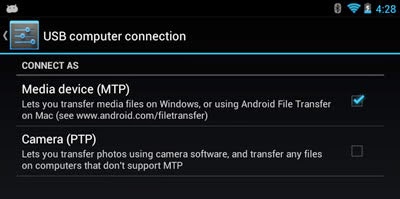
Now back to the main interface and hit "Convert" to start the conversion. Wait for moments till the conversion completed, then click "Open output folder" to quick locate converted SBS 3D MP4 videos, then, you can transferthe converted video files on your Samsung Gear VR for enjoy your fantastic 2D or 3D movies with 3D effects on Gear VR at anytime as you want.


More
How Can You play online/downloaded YouTube video with Roku?
Rip Blu-Ray To Plex Server To Set Up Home Theater
Which Audio and Video Formats Are Supported by iPhone 6
Get a Galaxy Grand/2 Video Converter to Score Yourself
Ripping DVD to Apple TV for playback on Onkyo receiver and Panasonic TV
Enjoy Christmas 2D/3D Blu-ray on PS4 When Staying at Home
How to View iTunes Movies via Kodi?
Top 6 Free Online/Desktop MP4 to MOV Video Converter

Src
Rip 2D and 3D Blu-ray to SBS/Top-Bottom/Anaglyph 3D MOV

Tuesday, January 12, 2016

Convert Multi-audio Channels MXF with Original Audio Tracks Preserved


How to keep multiple audio channels when converting MXF to MP4/MKV/MOV format with lossless quality? This guide provides a simple way to convert multi-track MXF to MKV/MP4/MOV file for playback and editing.


Found on multi-track MXF forum, there are following issues you may have encountered: 

“I have some MXF files from a normal Canon XF100 and want to convert them to any format that FCP adopts. The key point is I don’t want to lose any of the audio channels that I recorded with two microphones. Is that any workflow for this?” 

“I have downloaded some MXF files from the P2 Card, recorded using a Panasonic AG-HVX201AE Camera. I want to extract a small P2 MXF clip to play with QuickTime Player, is there any way to keep all my audio tracks?”


“I have some XDCAM files recorded from Sony PMW-200, when I put them onto pinnacle studios, they don’t lag. When I upload them to moviemaker however, the videos are very laggy and freezy. Is there any way to fix this? My clips have different mics on the left and right channels, so I want both audios (channels) to play at the same time.” 

From above, you can see many folks are asking how to get your editing programs and media players to work with multiple audio channels MXF files. I also have this problem but most the converting program cannot do this; they either loss one of my audio track or duplicate one of them and cover to another channel. So, to playback or edit multi audio channels MXF videos on Mac, the best way is converting MXF to program or device supported formats retaining multi audio channels. Here, Pavtube iMixMXF would be a quick answer to the questions mentioned above. You can choose to either mix the multiple audio tracks/channels into one track or repack them with all the audio channels preserved. 
 
The process of converting multi-audio channels MXF with original audio tracks preserved: 

Step 1: Download and install the iMixMXF. Launch the program and load MXF clips into it through either “Add video” button or “Add from folder” button. You can also drag and drop MXF files directly to the main interface. 


Step 2: Click the “Format” bar and select the output format you want under “Multi-track Video” catalogue. This iMixMXF can export files with multi-audio channels preserved for broadcasting, further editing, delivering and playing. 


Step 3: If you do not need all audio tracks for output, click “Settings” button you are allowed to uncheck the audio tracks you do not want for output. If you need to mix multiple audio tracks into one track, go to check “Mix into one track” on the lower left. Conversely uncheck it you will get multiple audio tracks separately. And you can choose to keep default settings or adjust parameters, like codec, bit rate, channels, etc, according to your different requirements. 


Step 4: Click the “Convert” button to start converting multi-audio channels MXF with keeping original audio tracks preserved. 

Conclusion: Find the generated files by clicking “Open” icon and you can transfer MXF footage with multiple audios for editing and playing. 


More 


How Can You play online/downloaded YouTube video with Roku? 
Review of Galaxy Tab 4: Main Specs and Video Playback Tips 
Is it possible to stream DVD via Plex to play on Smart TV? 
Sony Xperia Z3 benchmarks confirm rumored specs? 
Set Up ATV 4 for streaming HD videos with Dobly Digital 5.1 sounds 
Convert H.265/HEVC to PS4 for Samsung TV via Mac El Capitan 
Use Gear VR to watch 3D Blu-ray movies on Galaxy Note 4 
Converting YouTube FLV to iTunes friendly MP4/MOV format 

Src 
Convert MXF video with original multiple audio tracks

Sunday, January 10, 2016

No Audio Channels – Import Sony A7s MP4 to Resolve 10/11

The following guide is written to those people who wanna import Sony A7s MP4 files to Resolve 10/11 for editing with audio files lost. If you have the related importing troubles, why not read this article carefully for seeking the MP4 to Resolve solutions to get the troubles away? 


‘Dear all, I was wondering if you can help please!!! I just have a Sony Alpha A7S Mirrorless Digital Camera on hand. It is able to shoot video files either in XAVC S and AVCHD format. But I’m always failed in importing MP4 output footage to Resolve 10 for editing, no audios there. What did that happen? Why the audio files missed when importing my MP4 footage? Any good solutions there?’ 

Hot Reading: MP4 to iMovie/FCE MP4 to Premiere Pro MP4 and XAVC S 

Though Sony Alpha A7S is capable of recording Full HD 1920×1080 footage at 60p, 30p, 24p and 1280×720 footage at 120p in XAVC S recording format with MP4 wrapper, this XAVC S codec MP4 cannot be directly accepted by some hot NLEs as you know. Considering the XAVC S MP4 format is not an ideal video format for editing software to support owing to its special codec, so we have to convert the MP4 files from Sony A7s into best editing codec for Davinci Resolve. 

To accomplish the task to convert Sony A7s MP4 files to DNxHD MOV, which could be the best supported one for DaVinci Resolve 10/11, we highly recommend you this Pavtube HD Video Converter for Mac you can take as a good video converting assistant. Now let’s together read on to find a tutorial explaining how to transcode Sony A7s MP4 to DNxHD MOV format for working smoothly in DaVinci Resolve without quality loss. 
 
Workflow: Convert Sony A7s MP4 to DaVinci Resolve for editing: 

Step 1: Start up this program as a Sony A7s MP4 Converter for DaVinci Resolve. When its main interface pops up, click ‘Add files’ to input your source media on the main interface. 


Step 2: Choose output format for DaVinci Resolve(necessary!) 

To convert Sony A7s MP4 to DNxHD for DaVinci Resolve, you can from ‘Format’ bar, select ‘Avid DNxHD (*.mov)’ as output format under ‘Avid Media Composer’ column. You may see other suitable ones for other NLEs such like FCPPremiere ProiMovie, etc. 


Step 3: Custom video and audio settings(Optional) 

If necessary, you can click ‘Settings’ button and go to ‘Profiles Settings’ panel to modify video and audio settings like video encoder, resolution, video bit rate, frame rate, aspect ratio, audio encoder, sample rate, audio bit rate, and audio channels. 


When ready, click ‘Convert’ to start format conversion. As soon as the conversion is complete, you can click ‘Open Folder’ button to get the exported MOV files for use in DaVinci Resolve with optimum performance. From the guide above, you may find it is so easier for us to import the Sony A7s MP4 files to DaVinci Resolve for editing. 


More 
Stream XviD/Divx files to Apple TV for watching 
Stream ISO Files to Roku 3 via Plex: Rip ISO to Roku 3 Readable Formats Firstly 
Find my Data Back from Water Damaged iPhone 6 
How can I Get DVDs movies on Samsung Galaxy TabPRO 8.4 
Rip Blu-ray movies to Kindle Fire HD 8.9 for watching with best video quality 
Enjoy Christmas 2D/3D Blu-ray on PS4 When Staying at Home 
How to Play Sony Handycam 3D MTS on 3D TV with 3D Effect? 
Src 
No Audio Channels – Import Sony A7s MP4 to Resolve 10/11

Thursday, January 7, 2016

Transfer Videos, Photos, Music to Galaxy Note 3, Note 4


Are you looking for ways to transfer Videos, Photos, Music files from PC to your Samsung Galaxy Note 3, Note 4? Take a look at this article.

Less than a year after the previous Samsung phablet was launched, the Galaxy Note 4 keeps a familiar leather-effect rear, but encompasses it in a more premium-feeling metal frame. The Samsung Galaxy Note 4 is set to be the biggest smartphone (or phablet) launch of the year with significantly faster hardware and a fantastic Quad HD screen. If you already own last year's Galaxy Note, then you'd have to be a die-hard Samsung fan or have deep pockets to upgrade so swiftly.


No matter you plan to buy a Galaxy Note 4 or still have a Galaxy Note 3, what might rack your brain is, how to transfer your favorite Videos, Photos, Music to Galaxy Note 3, Note 4. Here we will walk you through the process and achieve the simple Galaxy Note 3, Note 4 media tranfer with step-to-step tutorials.

Part I. How to transfer files to Galaxy Note 3/Note 4 from a Windows computer?

1. Connect your Galaxy Note 3/Note 4 to your PC using the USB data cable.

2. Once connected, you should see a USB icon appears in the Notifications bar. Drag theNotifications bardownwards, and then tap on the Connected as a media device.


3. On the USB PC connection screen, ensure the Media device (MTP) checkbox is ticked. And now, you're ready to transfer files between your PC and phone.


4. Open up your PC Windows Explorer, and you should see your Galaxy Note 3/Note 4 shows up as a removable disk.

5. Access the phone storage via Windows Explorer. Here, you should see quite a number of folders such as Playlists, Ringtones, Pictures, Music and etc.


6. Next, drag-and-drop/copy-and-paste your music or video files from your computer to theMusic or Videos folder. The stock music and video players on your Galaxy Note 3 will search and list them on the apps automatically.

Note:You can create the Videos folder using the Windows Explorer, if it isn't in your phone.

7. Alternatively, you can create a new folder in either your phone storage or external memory card to store these files. Again, the music and video players on your Galaxy Note 3/Note 4 will search and list them on the apps automatically.

Note: Before disconnecting the device from the computer, safely remove the mass storage device. Otherwise, you may lose data saved in your device or damage your device.

Part II.How to transfer files to Galaxy Note 3/Note 4 from a Mac computer?

If you are a Mac user and have a Galaxy Note 3/Note 4, you probably have already noticed that this Android phone does not seem to be accessible when connected via USB to the Mac. This is because The USB connection uses the MTP protocol, which is not supported by Mac OS X natively.

Therefore, you first need to install Android File Transfer and Galaxy Note 3/Note 4 USB Drivers for Mac. By following these steps you can mount the phone and move local videos, music and photos to Galaxy Note 3/Note 4 for watching on the go.

1. Install Android File Transfer on your Macintosh.


2. After installing Android File Transfer, connect your Galaxy Note 3/Note 4 to your Mac via the USB cable. Wait for the phone to get connected and drivers to be installed.

3. Open up Android File System app. It should recognize your Galaxy Note 3/Note 4 and then will automatically open up with your internal phone memory directories.

Tip: If you get a “No Device Found” message, be sure your Galaxy Note 3/Note 4 is in Media device (MTP) transfer mode. You can do this by swiping down to open the notification tray and then tapping on theConnected As… message.


4. You can drag and drop files and media (video, music and photos) into the window (Galaxy Note 3/Note 4). Additionally, you can create new folders and delete files. During this time, you can't access the SD card from your Galaxy Note 3/Note 4 or share your Android phone's data connection with your computer via USB.

5. When the videos are copied to Galaxy Note 3/Note 4, you can disconnect your Galaxy phone from Mac.

Part III: Transfer Videos, Photos, Music from PC/Mac to Galaxy Note 3, Note 4 using kies 

You may also use the Samsung Kies software to manage files on the Galaxy. Just download and install the Kies software from the Samsung website. And lean to use Kies to transfer Videos, Photos, Music to Galaxy Note 3, Note 4 using Samsung Kies 3.

1. Install Samsung Kies 3, and then launch the software on your PC.

2. Connect your Galaxy Note 3/Note 4 to your PC using the USB data cable.

3. Taking music as an example, click the Music option below the Connected devices.

4. Next, click the + sign. If your phone has an external SD card, then you should see the Internaland External memory options. For this tutorial, I will select Internal Memory.


5. Next, through the Windows Open dialog, select the music files that you would like to copy to your phone.


Note: Now, you can click the Videos option (instead of Music) in Step 3 and then follow the rest of the steps to add video files to your phone.

Like the Galaxy Note 3/Note 4, it does not include an SD card slot for additional storage, so you may need to compress very big file to smaller file size.
Part IV: Transfer unsupported media files to Galaxy Note 3, Note 4 

Before transferring, you need to make sure that the file format is supported by the Galaxy Note 3/Note 4. Refer to Galaxy Note 3/Note 4 supported format. Although Galaxy Phone has large and high-res screen, it cannot break the boundary of playing Android compatible videos like MP4/H.264 only.

To play SD/HD Videos(HD MKV, AVI, Tivo, VOB, MPG, WMV, FLV, F4V, MTS, M2TS, etc.) on your Galaxy Note 3/Note 4, you need to prepare a video conversion software, such as Pavtube Video Converter to convert HD video to Galaxy Note 3/Note 4 optimized H.264 .mp4 files before downloading them to the phone.

And since Galaxy Note 3/Note 4 does not support an external Blu-ray or DVD drive, you need to rip your own Blu-ray and DVD movies to fit in Galaxy Note 3/Note 4 for enjoying.
About Samsung Galaxy Note 3 and Galaxy Note 4
Galaxy Note 3 comes with a wider 5.7-inch, Full HD screen, a slight boost from the Note 2’s 5.5-inch display, but is thinner and lighter, just weighting 168g. It is between mobile phone and tablet, so can be called a “phoneblet”.

Galaxy Note 4 is the fourth instalment in the Note phablet series. It brings a much sharper, 5.7-inch 1440 x 2560-pixel (Quad HD) display, a powerful Snapdragon 805 quad-core system chip running at up to 2.7GHz, 3GB of RAM and a plentiful 32GB of internal storage in the basic model. The Note 4 is also the first in the Note series to get optical image stabilization for its main camera.


More

Stream XviD/Divx files to Apple TV for watching 
Backup Blu-rays to Plex Media Server for streaming to Xbox One
Find my Data Back from Water Damaged iPhone 6
Stream TV recordings (Tivo shows) to Samsung Galaxy Tab 4 for playback
How to fix top 5 Apple TV Common issues?
View DVDs on HD TV for Playback via Mede8er Multimedia Player
Enjoy Christmas 2D/3D Blu-ray on PS4 When Staying at Home

Search Results

Wednesday, January 6, 2016

Watch 3D Youtube Movies on ZEISS VR One use Galaxy S5

What do you guys think of Carl Zeiss' attempts with VR One? Carl Zeiss mentions that VR One is built on an open-source platform, and while the base unit comes with a limited set of apps that allow you to view movies in 3D, browse through images, access Street View and interact with augmented reality, Carl Zeiss is offering an SDK to developers to build additional functionality to the headset. 


Now creating a 3D video on YouTube is everyone's forte, but how can we watch 3D YouTube video on ZEISS VR One use Galaxy S5, a cutting-edge development kit for mobile virtual reality? One possible solution is to directly get YouTube 3D videos on ZEISS VR One use Galaxy S5 with YouTube application. Alternatively, you can transfer some 3D YouTube movies downloaded on computer to Galaxy S5 via ZEISS VR One , so that you can play 3D YouTube videos on ZEISS VR One without YouTube opened. 

While, the 3D YouTube .flv is not a compatible format for ZEISS VR One, so you'd better convert your YouTube videos to ZEISS VR One playable 3D SBS MP4/MOV files first. To get it done, a 3D YouTube video converting program is needed. Searching online, some free converters can be taken into your consideration, you can read this review to find a suitable one. 

Actually, there are plenty of tools for converting YouTube videos, but a professional YouTube 3D video converter is what you need indeed. Luckily, Pavtube 3D Video Converter is just the right app that can help you to finish the task quickly and easily. It is a professional 2D/3D Videos copying software for ZEISS VR One. 

With it you can easily Convert 3D Youtube downloaded Videos, 2D/3D Blu-ray or DVDs movies, ISO folders to MOV, MP4, WMV,AVI, MPEG etc with 3D effect to create true theater entertainment at home instead of going to cinema. It provides the stunning 3D effects: MP4 Side-by-Side, Anaglyph and Top-Bottom 3D Video. Learn to Anaglyph 3D and Side-by-Side 3D difference

Note: For Mac users, iMedia Converter for Macis a helpful app to encode 3D Youtube downloaded Videos to ZEISS VR One on Mac (including 10.11 El Capitan and 10.10 Yosemite). Now download the right version and follow the tips below to finish your task. 

Convert 3D Youtube Movies for Viewing ZEISS VR One With SBS 3D effects 

Now, Free Download thie Top 3D Video Converter for VR One: 


Other Download: 

- Pavtube old official address: http://www.pavtube.cn/blu-ray-video-converter-ultimate/ 
- Cnet Download: http://download.cnet.com/Pavtube-Video-Converter-Ultimate/3000-2194_4-75938564.html 

*************************************************************************** 

Step 1: Import 3D Youtube Movies. 

Insert your 3D Youtube Movies, 3D/2D Blu-ray or standard DVD movie to disc drive, and click "Load from disc" button to load Blu-ray or DVD from ROM. For video file, click the "Add video" button, you can also transfer video files like M2TS, MTS, MXF, MOV, browse to computer hard drive and import video into this app. 


Step 2: Set ZEISS VR One friendly format. 

Click Format and select “MP4 Side-by-Side 3D Video(*.mp4)” under 3D Video. In general, mp4 is a well-accepted file format for its ability to save memory storage and keep up the video quality. Also you can choose 3D SBS MOV or 3D SBS AVI format. 


Step 3. Set advanced settings 

By clicking "Settings" button, output parameters are classified and can be adjusted freely: Video Codec, Video Size, Bitrate, Frame Rate, Audio Codec, etc. Just choose the best settings for ZEISS VR One. 

Step 4: Start 3D Youtube Movies conversion 

Hit the Convert button to start converting Any 3D Youtube movies to 3D MP4/MOV video for playing on ZEISS VR One. After a short conversion, you will get the ripped files. 

Note: The Zeiss VR One currently has two trays available - Samsung Galaxy S5 and the iPhone 6 (4.7"), Samsung Galaxy S4, S5, S6, Nexus 5, and LG-G3 smartphones, plus hundreds of apps available on Google Play and Apple App Store made for mobile VR devices. 

Additional Tips- How to Find 3D videos from YouTube: 

a. YouTube has official 3D channel; there you can find lots of 3D YouTube videos related to different niche. Rest you can customize your searches a bit by using the search queries. 
b. Use this phrase before your keyword, "yt3d:enable=true" so the actual search query becomes "yt3d:enable=true Technology" 
c. Just make sure the videos you are searching or viewing are 3D in nature. 

How awesome is this? Yeah, it is that good! And then you can enjoy Any 3D movies on ZEISS VR One easily. With this highly rated 3D YouTube Video to SBS Converter, you can also convert YouTube to play on Lakento VR Glasses, 3D TV and more. 

More 

How can I Convert BDMV to MKV, MP4, AVI, WMV, MOV etc. On PC/Mac 
Stream ISO Files to Roku 3 via Plex: Rip ISO to Roku 3 Readable Formats Firstly 
Convert ISO image files to iTunes for Streaming in Apple TV 3 via Airplay on Mac 
Watch Dvd With Multi-track Audio 
How to Play Sony Handycam 3D MTS on 3D TV with 3D Effect? 
Stream Videos from NAS to PS3 via DSLR for playback 
Which Budget Consumer Virtual Reality Headset Should You Buy? 
Convert and Play downloaded 3D Movies on 3D TV 

Src 
August 2015-Samsung Galaxy Video Converter 

Import Blu-ray/DVD in FCP X retaining surround sound track

Final Cut Pro X gives Mac users the best way to edit their Blu-ray/DVD movies. However, the best video format for editing in FCP X is Apple ProRes 422 (.mov), which uses I-frame–only (intraframe) encoding, providing faster rendering and real-time playback performance, and has a generous color sample ratio and bit depth, allowing for higher-quality rendering of visual effects. So, if you want to edit Blu-ray/DVD movie, you shoud do BD/DVD to Apple ProRes 422 conversion first. 


However, is it possible for keeping the multiple audio/video track separately as original during converting? 

I’m a movie fan and getting the movie in Blu-ray/DVD disc copied into a usable format with the surround sound has been a real challenge that I’ve worked on for over a year. And I wanna to do the editing in FCP X for removing a scene or a word (f-bomb typically) that we feel is not necessary and detracts from our enjoyment in watching a movie. 

To accomplish this goal, I recommend you a powerful multi-track prores converter for mac –Pavtube ByteCopy for Mac. It is not only capable of helping you to transcode Blu-ray/DVD discs to various output formats, but also it can transcode BD/DVD to Apple Prores with multiple audio and subtitle tracks.


Having tried MTR, iSky Soft, MakeMKV, DVD2OneX2, DVDRemaster, Ripit, but I was unable to get the movie into FCP x and maintain the surround sound with them. And Pavtube ByteCopy for Mac is the first product I found that allows a DVD or Blu-Ray to be converted for editing in FCP x and retain the surround sound track. 

In addition, it can keeping all the subtitles, suppose you are good at both English and Francia, and want to preserve both of them from original BD/DVD discs when converting, that is what Pavtube ByteCoy for Mac can do for you. And you can select the audio you want when enjoying movies. Now let’s download and install the software and follow the guide to see how it converts Blu-ray/DVD to Apple Proes with keeping surround sound track. Just refer to below details. 

Step 1. Launch it and click Load Disc button to load Blu-ray/DVD discs. 


Step 2. Click “Format” to find “Multi-track Video” catalogue, select “Multi-track Apple ProRes 422(*.mov)” as output format. 


With output default “Settings” you can get all audio tracks preserved. In addition, if you want more customization, you can also uncheck the audio tracks you do not need to output. Just find “Audio” under “Settings” button, then uncheck the undesired audio


Step 3. Click “Convert” to start conversion, when completed, click “Open” to find the generated .mov files. 

Obviously, it is easy to use software without any audio and video out of sync issue. You may wonder what else this software can do for you. Of course, it combines all features in Blu-ray/DVD Ripper, including various output formats selection, editing options support. Worthy to point out that it also supports lossless quality output. It is designd for users that do not need to deal with multi-track video/audio files, only $34.3 is needed. 

Tips: 

1. You can choose ByteCopy for Mac if you wanna add *.srt, *.ass and *.ssa subtitle in video by clicking “Edit” button. 

2. Besides multi-track Apple ProRes, Pavtube ByteCopy for Mac offers other options like multi-track MP4multi-track MKVmulti-track MOV and for you to choose for playback or editing. 

View Pavtube Special Offer page to get more Money-saving Tips:


In this way, you can successfully convert Blu-ray/DVD to Multi-track Apple ProRes for FCP X with Pavtube ByteCopy for Mac. Hope this guide helps! 


More 

How can I Convert BDMV to MKV, MP4, AVI, WMV, MOV etc. On PC/Mac 
Stream ISO Files to Roku 3 via Plex: Rip ISO to Roku 3 Readable Formats Firstly 
Convert ISO image files to iTunes for Streaming in Apple TV 3 via Airplay on Mac 
Watch Dvd With Multi-track Audio 
How to Play Sony Handycam 3D MTS on 3D TV with 3D Effect? 
Stream Videos from NAS to PS3 via DSLR for playback 
Which Budget Consumer Virtual Reality Headset Should You Buy? 
Convert and Play downloaded 3D Movies on 3D TV 

Src 
Import Blu-ray/DVD in FCP X retaining surround sound track

Sunday, January 3, 2016

Watch Dvd With Multi-track Audio

Generally, there are multiple audio tracks in the DVD movies, and you can choose the audio track to play with the DVD player as you want. Have collected some precious DVD video files on computer hard drive, however just cannot convert them to other video formats with your multiple audo tracks? Have no idea about how to convert the DVD video to playable MP4, MKV, AVI, MOV, etc. for sharing them with more friends and colleagues? 


No worry, here is what Pavtube ByteCopy for Mac can do for you. It’s not only your best tool to rip and convert DVD to any video format you like, but also the top BD/DVD multi-track converter to rip and convert DVDs to MP4 container format for freely watching on your tablet with multiple audio tracks and subtitles included. Just download it and follow this short guide below which shows you how to convert a DVD to play on your Table with multi-track. 

Step 1. Run Pavtube ByteCopy for Mac, put source DVD into ROM, Click “Load Disc” to import movie titles from DVD. The software decrypts DVDs of all regions. 

Note: If you want to combine multiple mp4 files into one, please check the “Merge into one file” option. 


Step 2. Choose MP4 format as output, here “Format > Multi-track Video > Multi-track MP4 (*.mp4)” is recomended for you. 


Tip: You can check the audios you want to keep and uncheck the audios you don’t need. It all depends on your own choices. 


Step 3. Click the “Convert” button to copy DVD movie to mp4 for playing on your tablet with your desired audio channels. The process takes about 10mins. When it completes, click “Browse” to find generated mp4 file with multiple audio tracks included. 

The DVD to multi-track mp4 converter is really easy to use. Hope it also works well for you. 

Here is the related money-saving trip, choose the one you need. 

ByteCopy($42) + Video Converter Ultimate($65) = Only $79.9, Save $27.1 
ByteCopy($42) + DVD Creater($35) = Only $44.9, Save $32.1 
ByteCopy($42) + Vidpie($29) = Only $54.9, Save $16.1 


More 

How to Stream MKV Video to Chromecast for Playback 
Get started to Stream Video from PC to Roku using Plex Media Server 
Enjoy all high definition media contents on iPhone 6 Plus 
Painlessly Convert MKV, AVI, VOB, WMV, Tivo, MP4, FLV Video to iPhone 6 for Enjoying 
Play Rented 3D Movies with Apple TV on Mac OS X El Capitan 
Stream Videos from NAS to PS3 via DSLR for playback 
Which Budget Consumer Virtual Reality Headset Should You Buy? 
Convert and Play downloaded 3D Movies on 3D TV 

Src 
Watch Dvd With Multi-track Audio