Sunday, November 15, 2015

Rip DTS-HD track on Blu-ray to FLAC 5.1 audio for playback


Q: “Has anyone else been ripping 5.1 DTS-HD audio from Blurays using the FLAC option in MakeMKV? As DTS-HD seems to be completely useless if you own a Mac, I thought I would try to rip lossless audio from a Blu-ray using the FLAC option in MakeMKV. My Mac is connected to the AV receiver via an optical cable and when playing the file back via Plex it did produce multichannel sound but my AV receiver seemed to think it was decoding Dolby Digital (?) Thanks.” 


Part I: How to Freely Converting Blu-ray HD audio to FLAC 5.1 audio 

As I mentioned in my first look at ripping Blu-rays, converting uncompressed PCM and lossless Dolby TrueHD and DTS-HD Master Audio to FLAC with 5.1 audio for use in Plex carries a number of benefits. 

  • It's also lossless, so no quality difference.
  • FLAC is an open, well-documented format and so you're not reliant on reverse-engineered implementations.
  • XBMC can decode FLAC to PCM and output it over HDMI, whereas it currently can't for DTS-HD.
  • Hard drive space savings can be significant, especially for PCM soundtracks.


There's little penalty in terms of the time taken to rip the disc either, as it's unlikely that your BD drive can copy data from the disc fast enough for the conversion process to become a bottleneck.What you need: This process still usesMakeMKV, with the feature enabled in by checking the advanced options box in the settings. TrueHD decoding is built in, but you'll need to find a separate DTS module and point MakeMKV to that. All you then need to do it choose the ‘FLAC’ preset when ripping a disc. Otherwise the process is identical. 

Part II: Use Top Blu-ray Audio to FLAC Ripper for Plex to Convert a pure audio Blu-ray Audio to FLAC audio files with 5.1 audio on Mac 

To extract Blu-ray discs to Plex accepted FLAC audio files on Mac, you could use Pavtube ByteCopy for Mac which is an effective Mac Blu-ray Audio Converter that could Convert Blu-ray music to lossless FLAC 5.1 audio format. Still delivering an ultra-high quality listening experience on Mac. Read the review


Hot News for all Mac users! Pavtube Studio has launched a user-requested upgrade for all its Mac BD/DVD and package tools: DVDAid for Mac, BDMagic for Mac, ByteCopy for Mac, iMedia Converter for Mac to version 4.8.5.1, which focuses on the addition of the H.265 encoders and decoders. 

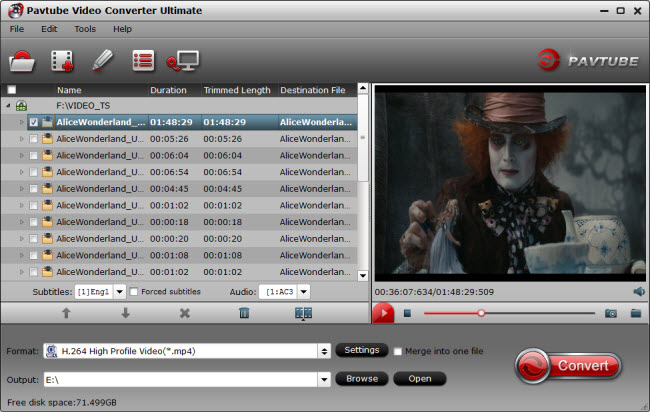
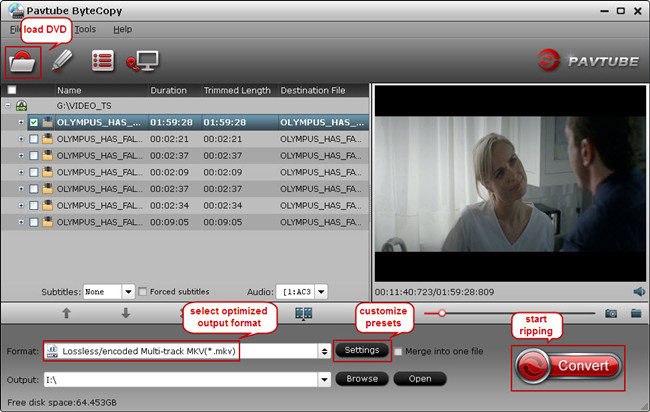
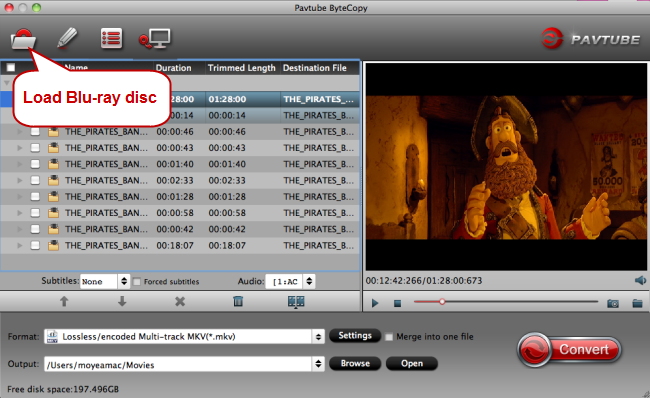
Step 1: Install and launch the Mac Blu-ray Audio to FLAC Ripper (Windows version: Pavtube ByteCopy ); import your Blu-ray Disc or Backup saved on hard drive by clicking “Load File” icon. 


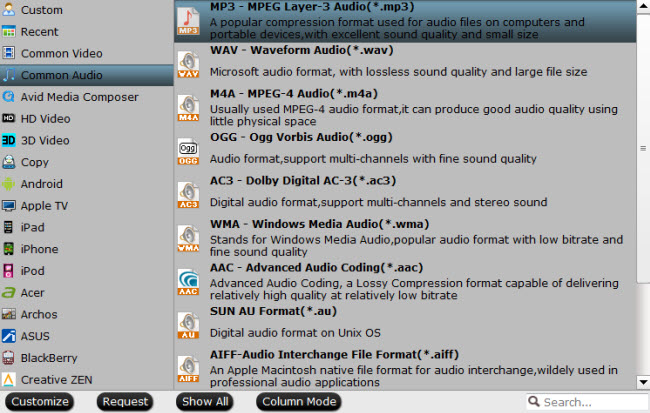
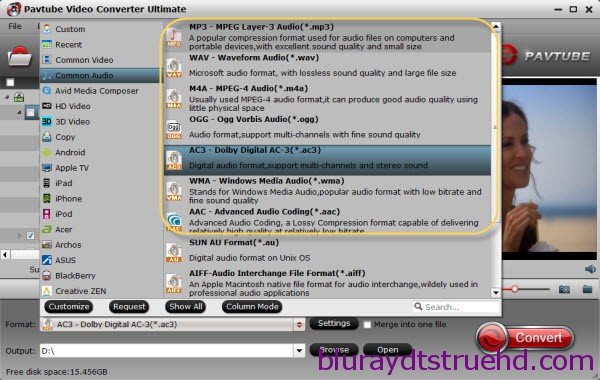
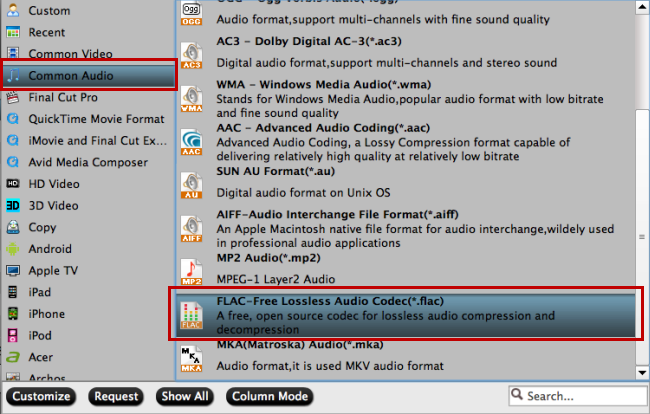
Step 2. Choose Lossless FLAC audio format. Here click the format bar to follow “Common Audio” and “FLAC-Free Lossless Audio Codec (*.flac).” as the output format. 

Output Audio Format: WMA (with 7.1 channels), AAC (with 5.1 channels), AC3 (with 5.1 channels), MKA (with 5.1 channels), MP3, WAV, M4A, OGG, WMA, AU, AIFF, MP2, FLAC. 


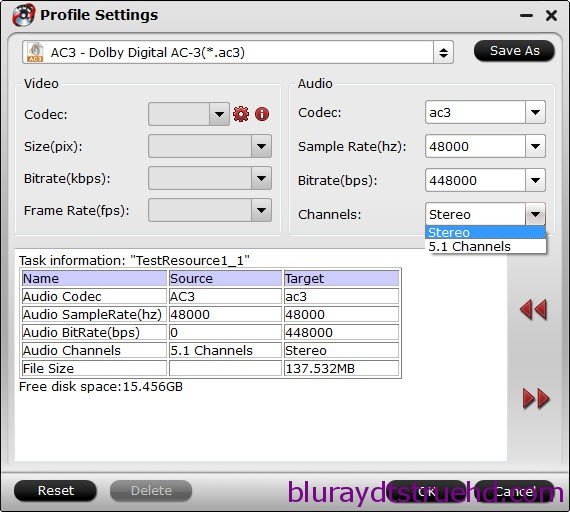
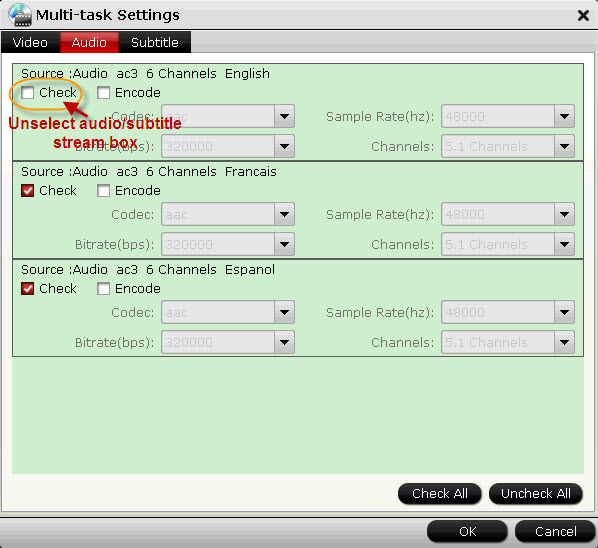
Note: Clicking Pavtube format list, we can clearly find FLAC-Free Lossless Audio Codec(*.flac) preset. But hitting “Settings”, the offered sample rate is limited to 22050hz, 32000hz, 44100hz and 48000hz. It works smoothly without most devices before, but if you want to get better audio quality by improving the sample rate (to 96000hz, ect.), this guide is right here to help. When you select AC3 as output audio format, you have the choice to select Channels as 5.1 Channels. 

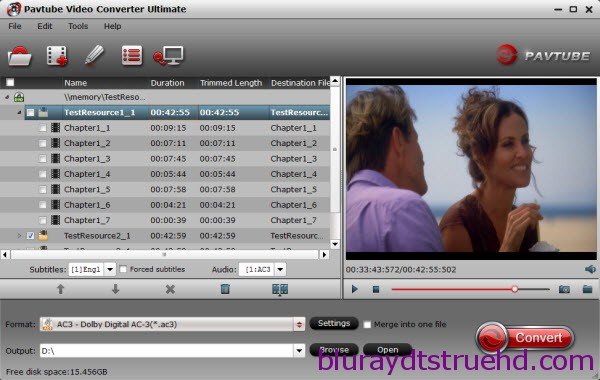
Step 4. Convert pure audio Blu-ray to lossless FLAC 

Click the red button on bottom-right corner to realize conversion from high fidelity pure audio Blu-ray to lossless FLAC for VLC. After completing conversion from high fidelity pure audio Blu-ray to lossless FLAC, you can streaming the converted pure audio Blu-ray for VLC with Hi-res audio quality. 

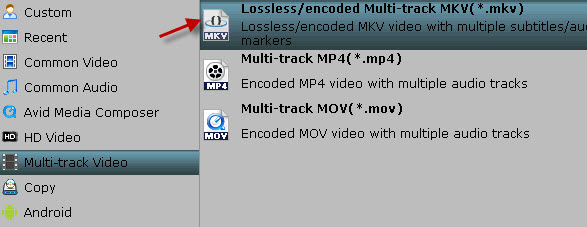
In addition, Pavtube ByteCopy for Mac can convert latest Blu-ray and DVD movies to any other formats like MP4, MOV , M4V, AVI, WMV, MPG, MKV, etc or MP4/MOV with multi-track audios for playback and it is also able to encode Blu-ray movies and DVDs to MKV container format with preserving chapter markers, multiple audio tracks and subtitles. 

More 

ISO to AVI - How to Convert Backup ISO to AVI to read it on PS3 
Rip/Backup Blu-Ray To Laptop To Watch Without External Player 
Enjoy Blu-ray movies on Samsung 4K TV via USB flash drive 
Stream DVD to Home Theater for Movie Visual Experiment 
Rip DVD to VLC on Mac OS X El Capitan 
Problems of encoding a TrueHD 7.1 MKV with Handbrake 
Top 5 Best Blu-ray Ripper for Mac Programs Review 
Easily convert DVD to PS3 with Dolby Digital 5.1 channels audio 


Src 
Rip DTS-HD track on Blu-ray to FLAC 5.1 audio for playback 

Thursday, November 12, 2015

Easily convert DVD to PS3 with Dolby Digital 5.1 channels audio


This post will give you the easiest solution to rip DVD movies to PS3 for playing on HDTV or Home Theatre, especially for users who want to keep the 5.1 audio track. 

To start, just have a look at a question asked by a friend of mine: 
I am ripping material off my standard DVDs to an MP4 format to play back on my sony playstation. Is there a way I could save 5.1 audio for playing on my PS3?
Additional Tips:

The following types of files can be played by PS3 under (Video)
 
  • - MPEG-4 SP (AAC LC)
  • - H.264/MPEG-4 AVC Main Profile (AAC LC)
  • - MPEG-1 (MPEG Audio Layer 2)
  • - MPEG-2 PS (MPEG2 Audio Layer 2, AAC LC, AC3(Dolby Digital), LPCM)
  • - MPEG-2 TS (MPEG2 Audio Layer 2)
  • - AVI
  • - Motion JPEG (Linear PCM)
  • - AVCHD (.m2ts)
To view your DVD movie on your PS3, Pavtube DVDAid is the best tool for you. Overall, this program can help you extract DVD movies to PS3 playable format, and it has PS3 profile preset with remaining AC3 5.1 audio for output. The Mac version is Pavtube DVDAid for Mac. Below is guide for you to learn how to convert DVD to PS3 with 5.1 channel. 

Step 1: Run Pavtube DVD to PS3 Converter, and load DVD files to it. You can click "DVD ROM" to load movie from DVD drive or "ISO/IFO" DVD ISO file. 


Step 2: Select output format for PS3. Click on the drop-down list at the opposite side of "Format", and then choose "PSP/PS3" > "PS3 Video AC3 5.1 (*.avi)" format. The format is designed for users that wanna get Dolby Digital 5.1 channels audio when streaming DVD rips to PS3. 


Tip: This PS3 DVDAid let users control/customize output file quality. To improve video quality, simply click "Settings" and set video bitrate up. 


Step 3: Start ripping DVD to AVI video for PS3 streaming. 

Click "Convert" button to rip DVD to PS3, once the ripping task is finished by Pavtube DVD to PS3 Converter, you can click "Open" button at the bottom of the main interface to get the output AVI file for streaming to PS3. 


Thanksgiving Day always comes with movies. I believe you must have prepared some Thanksgiving movies for enjoy with your family after dinner. With this wish, how can you bear the incompatibility issue when playing Thanksgiving Blu-ray/DVD movies on your HD TV, iPad, 4K Projector, etc. To avoid the embarrassing situation, you’d better rip the Blu-ray/DVD movies to your multimedia players with most compatible format and specs by using 
Pavtube BDMagic for Windows / Mac 
Pavtube DVDAid for Windows / Mac 
Pavtube ByteCopy for Windows / Mac 

When enjoying the Thanksgiving movies and having the Thanksgiving dinner together, how can you not record the scene to remember the warm time? After you record the happy time, you maybe want to edit the shooting in iMovie, FCP, Premiere Pro CC, etc before you sent it to your other family members or share it on Facebook. While putting the shoot into video editing program, you probably need the help ofPavtube Video Converter Ultimate and iMedia Converter for Mac, which can convert your HD/4K shoot to H.265 MKV/MP4, HD MP4, QuickTime, MOV, ProRes, AIC, DNxHD, MPEG-2, WMV, H.264, MPEG-4, etc. for your FCP X, iMovie, Premiere Pro CC, Sony Vegas Pro 13, Windows Media Player, VLC, Youtube, etc. On Windows 10/8.1/8/7/XP and Mac OS X 10.11 El Capitan, 10.10 Yosemite, 10.9 Mavericks, 10.8 Mountain Lion, 10.7, 10.6, 10.5. 

Pavtube Video/BD/DVD software can convert Blu-ray/DVD, 4K/SD/HD video in any format to H.265 MP4/MKVM3U8, MP4, MOV, MKV, AVI, M4V, etc. Especially, ByteCopy can rip Blu-ray/DVD to lossless MKV keeping multi-track subtitle/audio and all chapter markers. What’s more, Pavtube adds optimized preset profile for main digital products, like TV series, iPad, iPhone, Samsung, Sony, PS3/PSP, Xbox One/360, Android Tablet/Phone, Surface, etc. 

Hot Search: Blu-ray Tips | DVD Tips | Chromecast Tips | Roku Tips | PS4 Tips 

All of the products can be get now at up to 40% off discount. Below is the list: 

1. 40% OFF Pavtube DVDAid for Windows/Mac 

Original price: $35 
Now: $21 

Reasons to choose Pavtube DVDAid 


2. 30% OFF Pavtube BDMagic for Windows/Mac 

Original price: $49 
Now: $34.3 

Reasons to choose Pavtube BDMagic 


3. 20% OFF Pavtube ByteCopy for Windows/Mac 

Original price: $42 
Now: $33.6 

Reasons to choose Pavtube ByteCopy 


4. 20% OFF Pavtube Video Converter Ultimate for Windows/Mac 

Original price: $65 
Now: $52 

Reasons to choose Pavtube Video Converter Ultimate 


You won’t get a Blu-ray/DVD Software at such low price in normal days. So if you have a plan to purchase a BD/DVD/Video Converter in the near future, why not push the schedule forward and get it inPavtube Thanksgiving Promotion activity. 

Additional: To help you make a wise choice, I did a deep review and comparison between the four backup tools. You can check out the differences and then choose the favorite to create high quality Blu-ray/DVD/ISO/4K/HD Video and Movie backups: Pavtube Softwares Comparison: ByteCopy vs BDMagic vs DVDAid vs Video Converter Ultimate 

Related Guides 

1. Pavtube DVDAid for Windows/Mac Guides


2. Pavtube BDMagic for Windows/Mac Guides


3. Pavtube ByteCopy for Windows/Mac Guides


4. Pavtube Video Converter Ultimate for Windows/Mac Guides


That’s All! 


More 

Apple iPhone 6 and iPhone 6 Plus on Pavtube Special Topic 
Dropbox brings Mailbox to Android, launches Carousel 
How to get the World Cup Schedule in Google Calendar 
Rip a DVD ISO to MKV for streaming via Plex with multi audio tracks 
Does Samsung Galaxy TabPro 10.1 supports 720p/1080p MKV Video Playback 
Play TiVo recordings on Kindle Fire HDX, Kindle Fire HD and Kindle Fire 
Strore DVD ISO onto QNAP with VLC server and stream to Sony Bravia TV 
Convert AVI from MiniDV cassettes to Apple TV with AC3 5.1 

Src 
Easily convert DVD to PS3 with Dolby Digital 5.1 channels audio 

Tuesday, November 10, 2015

Pavtube Thanksgiving Deals - Up to 40% Off Discount


Pavtube launched 40% OFF Thanksgiving Promotion 2015 when users can get top Video/DVD/BD Converter for Win/Mac with the least money.
Have you prepared the Thanksgiving gift for your Mum and Dad? If not, Pavtube gives you the best idea. You can record the happy time with your parents and add your thanks in the video using a video editing program. To release the idea, Pavtube Studio prepares Thanksgiving Special Offer where you can get the best tool to help you achieve the video pruduce.


Pavtube will offer you the professional and top-rank Video/BD/DVD software at a lower price than ever in the Thanksgiving celebrating activity. These top products includes Pavtube BDMagicPavtube DVDAid,Pavtube ByteCopy and Pavtube Video Converter Ultimate. These programs help you convert your Thanksgiving shoot to iMovie, FCP, Premiere Pro CC, etc to edit and rip DVD/Blu-ray Thanksgiving movies to your Apple TV, iPad Mini 4, Surface Pro, PS4, Xbox One, etc with the most compatible format and original video quality. You even can trim a video footage in movies with them to add your own Thanksgiving record.

If you want to know more the function of Pavtube products and the difference between them, just go to visit Pavtube Studio Official Site.

Once you have a Pavtube product in hand, you will enjoy the service of life-long technical support and update in time to compatible with any Win/Mac system upgrade. Catch this opportunity and enjoy the best video production experience with the least money in Pavtube.

The price comparison of Pavtube featured products between Thanksgiving price and original price is as below:

  • Pavtube Video Converter Ultimate: Original price $65, Now $52 
  • Pavtube BDMagic: Original price $49, Now $34.3 
  • Pavtube DVDAid: Original price $35, Now $21 
  • Pavtube ByteCopy: Original price $42, Now $33.6

Note: This attractive price will only be get until Thanksgiving promotion ends. Please bear in mind all software programs will go back to original prices once the Thanksgiving special offer 2015 ends.


Src
Pavtube Coupon Code for Thanksgiving: Up to 40% OFF BD/DVD Copying Tool 

Practical Solution – Convert AAC to MP3 Using iTunes


Need to convert all your of AAC music files to MP3 on iTunes? Using the built-in features in iTunes, you can convert AAC songs to MP3 with just a few quick clicks. Music bought from the iTunes Store comes in the AAC digital audio format. While AAC is thought by many to be superior to MP3, it isn’t compatible with as many devices as MP3 (though AAC works pretty widely). Still Want to play AAC files on all your devices? Here, we will show you two parts about how to Convert AAC to MP3 Using iTunes and a professional AAC to MP3 Converter as well as a step by step guide on how to convert AAC to MP3 using iTunes. 


Hot Search: Extract Audio from DVD | Play FLAC files on iPhone | iPhone 7 Rumours | Play Audio on Apple Watch | 

Part I: How to Convert AAC to MP3 Using iTunes? 

1. To begin, you have to make sure iTunes is set to create MP3 files (its encoding functions allow you to create many kinds of files, including AAC, MP3, and Apple Lossless). To do this, you’ll need to open the Preferences window.On Windows do this by going to Edit -> Preferences. On a Mac go to iTunes -> Preferences. 

2. In the Preferences window that pops up, click the “Import Settings” button towards the bottom of the General tab. You’ll find it next to the “When you insert a CD” drop-down box. 


3. In the Import Settings window that pops up, choose MP3 Encoder from the “Import Using” drop-down. You’ll also want to choose something in the “Setting” menu. The higher the quality setting, the better the converted song will sound. I’d recommend 192 kbps or 256 kbps, and certainly nothing lower than the current bit rate of the AAC file to be converted. When you’re happy with your settings, click “OK.” Click “OK” in the Preferences window to close that. 


4. Next, find the song or songs you’re converting from AAC to MP3 in iTunes. You can select songs one at a time, in a group by using Control-A on Windows and Command-A on a Mac, or in a group of non-contiguous files by holding down Control (on Windows) or Command (on Mac) while you click each file. 

5. When you’ve selected all the files you want to convert from AAC to MP3, you have two choices for how to begin the conversion:
  • Click on the File menu in iTunes, then Create New Version, and select “Create MP3 Version”, OR
  • Right click on the selected files and choose “Create MP3 Version” from the pop-up menu.


When you click on one of those options, the conversion will begin. How long it takes will depend on how many songs you’re converting and the conversion settings. 

6. When the conversion from AAC to MP3 is complete, you’ll have two copies of each converted file, one in AAC, the other in MP3. You may be happy to have both copies. If not, though, and you want to delete one, you’ll need to know which is which. In that case, select the file you’re curious about and hit Control-I on Windows or Command-I on a Mac. This will pop up the song’s information window. TheKind field will tell you whether the song is an AAC or MP3. 


Part II: iTunes Alternatives Called Pavtube Video Converter Ultimate 

In order to play AAC files to Apple devices, you’d better to convert them to popular formats such as MP3 and other formats. To satisfy the different requirement of the person, we specially develop a superior AAC Converter -Pavtube Video Converter Ultimate and iMedia Converter for Mac are recommended to Windows 10 and Mac OS X El Capitan users. 

With it, you can use this all-in-one audio converter which supports converting between nearly all audio formats like MP3, WAV, WMA, M4A, AIFF, FLAC, Apple Lossless ALAC, APE, AU, RA, DTS, AC3, AAC, MP2, OGG and etc. In fact, Pavtube Video Converter Ultimate is not only an audio converter but also an audio player, which supports to play various kinds of audio files freely, no matter you are Mac user or Windows user. Learn >> Why Choose this Top Audio Converter? 

Free Download this Top AAC to MP3 Converter: 


Other Download: 

- Pavtube old official address: http://www.pavtube.cn/blu-ray-video-converter-ultimate/ 
- Cnet Download: http://download.cnet.com/Pavtube-Video-Converter-Ultimate/3000-2194_4-75938564.html 

Step 1: Load AAC Files. 

Click on “Add File” button to add the audio files that you want to play on devices. Or simply drag your files or the folder where your files are to the program interface. It supports batch conversion, you can import and transcode multiple AAC files at one time. 


Step 2: Set output format. 

Click Format bar to open the output format window. In the “Common Audio” category, you’ll find iTunes supported MP3 audio format, just choose it as the output format. 


Step 3: Start AAC to MP3 Conversion. 

Just click the big “Convert” button on the bottom right of Pavtube AAC to MP3 Converter to start and finish the AAC to MP3 Conversion with high output quality and fast speed. 

Now, you can playing AAC in the mentioned players and devices becomes easy and comfortable. 


More 
Ripping DVD to Multi-track MP4 video on Mac OS X El Capitan 
The genocide of Roku, and can UHDTV attain where 3D TV failed 
Rip a DVD ISO to MKV for streaming via Plex with multi audio tracks 
Rip/Store my Blu-ray collection on NAS server for easy usage with Tablet, PC and TV 
Put DVD to Galaxy S6/S6 Edge for Gear VR Innovator Edition 
The best solution to play AVI videos on Kindle Fire HDX Smoothly 
Compress 4K Ultra HD Resolution Videos from YouTube 

Src 
Convert AAC to MP3 Using iTunes - Multimedia Hive

Sunday, November 8, 2015

Best DTS Converter – Easily Convert DTS to AC3, MP3, WAV, AAC, FLAC, etc


DTS (Digital Theater Systems) and Dolby Digital (AC-3) are the two most famous audio codec used in professional cinema and home theater system to record and play back multi-channel high-definition audio. 


A file with .DTS extension is multi-channel audio file encoded in the Digital Theater Systems (DTS) format. DTS file saves five tracks (include center, left-front, right-front, left-rear, and right-rear) of audio data used for surround sound. In order to play all channels of a DTS file, the output and speaker setup must support 5 channel audio. For example, this may be accomplished by using an optical out connection with a surround speaker system. 

However, some HD TV like LG, Samsung smart TV and WD TV; Many media player like VLC, Windows Media Player, QuickTime player will not play DTS audio, and converting DTS to other popular audio formats like AC3, WAV, MP3, AAC, WMA or converting MKV, M2TS video with DTS sound is a customarily and highly recommended way to enable us to play DTS freely. 

Here recommend you Pavtube DTS Video Converter, professional yet easy-to-use DTS Converter, has the power to easily convert DTS to nearly all kinds of popular audio formats like DTS to AC3, DTS to MP3, DTS to WAV, DTS to AAC, FLAC, AIFF, AU, MP2, RA, M4A, Apple LossLess, etc with zero quality loss. Moreover, it allows you to do simple editing to the videos such as cropping, altering video dimension, adding special effect, and adjusting video or audio parameters and supports batch conversion. The mac version is Pavtube DTS Converter for Mac.Easily Convert DTS to AC3, MP3, WAV, AAC, FLAC, etc 

Firstly, download and install Pavtube DTS Audio Converter

1. Click “Add Video” button to load your source DTS audio files or directly drag the files. 


2. Click “Format” bar to designate the output format as your need, you are recommended to choose “General Audio” category choose “AC3 – Dolby Digital AC-3(*.ac3)” or “MP3 – MPEG Layer-3 Audio (*.mp3)” or “WAV – Waveform Audio(*.wav)” as the output format . 


3. If you would like to customize the video and audio parameters, you can click “settings”, adjust the parameters as you want, like Video Codec, aspect ratio, bit rate, frame rate, Audio codec, sampling rate, bit rate, channels. 


Tip: If your source audio files are 5.1 channels, you can convert your audio to 5.1 channel. From “Channel” drop-down choose 5.1 channels. 

4. Click “Convert” to start to convert DTS to AC3, MP3, WAV, AAC, FLAC, etc. 

With this DTS Audio Converter (20% OFF now), you can batch convert DTS audio, video with DTS sound to any popular audio formats. As you see, it is so easy! 

Soon after the conversion is finished, just click “Open” button to get the converted AC3, MP3, WAV, AAC, FLAC files for perfectly playing anywhere without limit.AdditionalTips: 

a. To play DTS in iDevice, QuickTime, and Final Cut Pro, please select “MP3 MPEG Layer-3 Audio (*.mp3)”, “AAC Advanced Audio Coding (*.aac)”, “AIFF Audio Interchange File Format (*.aiff)” or “M4A MPEG-4 Audio (*.m4a)” as the output formats from “General Audio” category; If you care about the quality of output format, please choose “FLAC-Free Lossless Audio Codec(*.flac)”; 

b. To play DTS in Windows Media Player, Windows Media Center, Windows Movie Maker and PowerPoint, please appoint “WAV Waveform Audio (*.wav)” or “WMA Windows Media Audio (*.wma)” as the output formats from “General Audio” category; 

c. To play DTS in Android, BlackBerry, Samsung, Xbox, LG, etc, please select “MP3 MPEG Layer-3 Audio (*.mp3)”, “AAC Advanced Audio Coding (*.aac)” or “WAV Waveform Audio (*.wav)” from “General Audio” category. 


More 

Watch Blu-ray/DVD with French subtitles on MacBook Pro 
Encode Blu-ray movies playback on Mac Mini HTPC with PLEX 
Top 5 Best Video Converter Ultimate Program Review for Movie Fans 
Convert Blu-ray with LPCM audio to playable AC3 5.1 MKV 
Insert downloaded YouTube Video into WPS Office Presentation 
Backup DVD to MKV/HD MKV on Windows 10 
PS4 4K Streaming – Play 4K Movie and Videos with Sony PS4 
Rip Blu-ray to 4K iMac with El Capitan without Quality loss 


Src 
Batch Convert DTS to AC3, MP3, WAV, AAC, etc for playing

Thursday, November 5, 2015

Keep both Dolby Digital 5.1 and Dolby TrueHD 7.1 audio when ripping Blu-ray discs


Here is a brief guide to teach you how to keep best audio quality (Dolby Digital 5.1/Dolby TrueHD 7.1 audio) when playing Blu-ray Disc. 

Most Blu-ray Discs have lossless audio, which means, obviously, no loss of sound quality, and they are encoded in three ultra high-quality lossless formats: uncompressed PCM, DTS HD Master Audio and Dolby TrueHD. 

The Dolby TrueHD technology and DTS-HD Master Audio can deliver unprecedented home theater experience. In case that you are definitely love Blu-ray audio with the high quality sound experience, you may have the need keep Dolby Digital 5.1/Dolby True HD 7.1 when playing Blu-ray on computer and media player. 

How to meet your need? Here Pavtube ByteCopy is just the one you need which is a best BD ripping tool and backup disks without quality loss, allow full preservation of all audio tracks, subtitles and chapter markers, what's more, it saves 7.1 surround audio from original disks. 

Now just refer to the guide below ripping Blu-ray discs with keeping Dolby Digital 5.1 or Dolby TrueHD 7.1 audio 

Compare: MakeMKV vs Pavtube ByteCopy vs DVDfab 

Software availability: 

Pavtube ByteCopy Trial version - A trial is free but functional-restricted. Lossless output can be used 3 times only. You may download a trial and see how it works. 

Pavtube ByteCopy Retail version. A full version is offered at $42 by Pavtube Studio. 

How to keep Dolby Digital 5.1/Dolby True HD 7.1 audio when ripping Blu-ray movies? 

Step 1. Hook up an external BD drive with my desktop (if there is not an internal one), and place a Blu-ray Disc into the BD drive. 

Step 2. Run Pavtube ByteCopy software and click the "Load file(s)" icon to import movie files from Blu-ray Disc. 


Step 3. In the dropdown list of Format menu, you can find several MKV options for output. Here we recommend "Lossless/encoded Multi-track MKV (* mkv)" under "Multi-track Video" catalogue. Because it will save multiple video, audio and subtitle tracks form original Blu-ray in output MKV and you won't suffer any quality loss. 


Note: Make sure the original BD disc does contain Dolby TrueHD audio, otherwise you still can't get Dolby TrueHD 7.1 audio saved. 

Step 4. You can check the audios you want to keep and uncheck the audios you don't need. It all depends on your own choices. 


Note: Not every AV receiver/amplifier can decode Dolby TrueHD and DTS-MA audio, but most of them support Dolby Digital, i.e., AC-3 5.1 audio codec. When ripping Blu-ray Disc for playing back with PC and HD media players, better check the supported codec of your device first to set a best fit for your player. 

So to transode blu-ray audio streams into Dolby Digital 5.1 tracks, you can check "Encode" and get a encoded mkv file. 

Step 5. Click the "Convert" button to start ripping the Blu-ray movie to MKV file. After conversion I click "Browse Export Path" and get an MKV file. 

Pavtube ByteCopy extracts the main movie with all subtitles from disc and seals the contents with riginal Dolby Digital 5.1 and TrueHD 7.1 audio saved into MKV container which means ripping Blu-ray lossless. 

That's it! Now you will have a great high definition Blu-ray with great audio experience!. 

More 

PS4 4K Streaming – Play 4K Movie and Videos with Sony PS4 
Rip Blu-ray to 4K iMac with El Capitan without Quality loss 
Backup DVD to MKV/HD MKV on Windows 10 
Watch Blu-ray/DVD with French subtitles on MacBook Pro 
Encode Blu-ray movies playback on Mac Mini HTPC with PLEX 
Top 5 Best Video Converter Ultimate Program Review for Movie Fans 
Convert Blu-ray with LPCM audio to playable AC3 5.1 MKV 
Insert downloaded YouTube Video into WPS Office Presentation 


Src 
Keep both Dolby Digital 5.1 and Dolby TrueHD 7.1 audio

Tuesday, November 3, 2015

Convert Blu-ray with LPCM audio to playable AC3 5.1 MKV


Have you converted Blu-ray to MKV with LPCM audio and it's not playable in any software? Read this article, you can know the real reason, and get the best solution.

Q: "Every time I rip a bluray with an LPCM track using MakeMKV, it's not playable in any software. Why?"

You will find the same issue over and over again on all of forum posts. Maybe you're one of those people. Then do you have solved this problem yet? And I was also wondering why so many people have run into the same issue when ripping Blu-ray that contain LPCM audio. After hours of Google I found the crux- actually the MKV container format is not compatible with LPCM codec! So if you want to watch Blu-ray movies with LPCM Audio track, you need to convert Blu-ray with LPCM audio to other Audio like Dolby Digital AC3, DTS, Dolby TrueHD, DTS-HD HR, DTS-HD MA, PCM, etc, which can be supported by MKV container format.

Now the question- How to rip a Blu-ray Disc with LPCM audio to playable MKV?

Of course, you can keep on using MakeMKV, just leave out the LPCM audio track when converting Blu-ray to MKV. As we all know, there are multiple audio tracks in a Blu-ray, so you can convert Blu-ray to DTS-HD, TrueHD, AC3, DTS, etc. To make sure you're getting the movie track, use Pavtube ByteCopy to convert Blu-ray- it converts LPCM to AC3/AAC/PCM 5.1 when ripping a Blu-ray movie to MKV.

For Converting Blu-ray LPCM to Dolby Digital AC3 5.1, you need to put your Blu-ray Disc into Blu-ray Disc drive connected to your PC, and you need to free download Blu-ray to MKV converter and run on your PC. After that, follow the steps to Convert Blu-ray to MKV

Step 1. Load movie. Click the “Load file(s)” icon to import movie files from Blu-ray Disc for backing up to MKV.


Step 2. Convert LPCM to AC3 5.1 audio.

I think you may want to keep one more tracks, so you can choose the “Multi-track Videos > Lossless/encoded Multi-track MKV(*.mkv)”. After that, you need to click “Settings” to set parameter. Click the “Subtitles” and “Audio” to uncheck the audio and subtitles you don’t want to keep.


Tip: To keep VC-1 video without changing, switch to "Video" tab and uncheck the "Encode" box. If you'll play ripped Blu-ray on Popcorn Hour NMT or other HD media players, better check "Encode" under the "Subtitles" tab, since the Blu-ray PGS subtitles are not supported by HD players.

Step 3. When back to the main interface, click “Convert” button to start ripping the Blu-ray movie with LPCM converted to AC3 5.1 audio.

About LPCM codec:

Linear pulse-code modulation (LPCM) is a method of encoding audio information digitally. The term also refers collectively to formats using this method of encoding. The term pulse-code modulation (PCM), though strictly more general, is often used to describe data encoded as LPCM. LPCM has been defined as a part of the DVD (since 1995) and Blu-ray (since 2006) standards. It is also defined as a part of various digital video and audio storage formats.

Learn more features about Pavtube ByteCopy.


More


How to Watch Blu-ray Movies on QuickTime on Mac OS X El
Can’t Transfer Blu-rays on your New iPod Touch
Put and Play Digital Copy movies on Galaxy Tab 3
Work Panasonic HD MTS Files with iPad or Apple TV Well
Easiest way to convert Video_ts folder for use on Plex server
Best DVD Copying software for ripping DVD to store on NAS
Play DVD on iPad, Backup DVD to Wireless Plus for streaming to iPad
Stream/Transfer ISO files to Chromecast within 3 clicks

Src
Watch Blu-ray/DVD with French subtitles on MacBook Pro