Full disc copy Blu-ray with keeping 7.1 audio
As you know, Blu-ray comes with lossless audio quality. You are definitely love Blu-ray audio with the high quality sound experience. There are mainly three lossless audio codecs used in Blu-ray disc: PCM, Dolby TrueHD and DTS-HD MA. And the Dolby TrueHD technology and DTS-HD Master Audio can deliver unprecedented home theater experience, so there may be no one willing to loose the wonderful audio while backup a Blu-ray movie. If you have collected lots of original BD disc and want to keep the Dolby TrueHD 7.1 audio from Blu-ray discs. Here we will give you an easy fix.
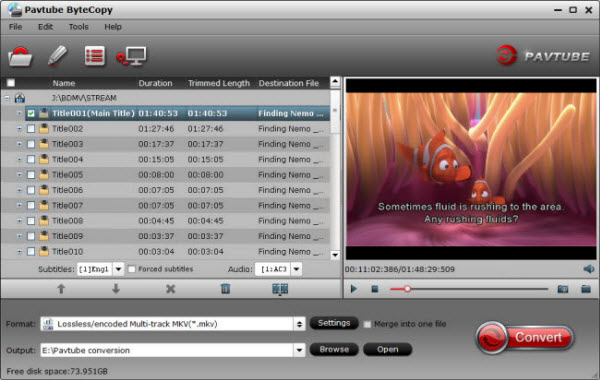
The top Blu-ray Copying tool is able to read TureHD audio and output 7.1 TrueHD passthrough. It supports convert Bluy-ray (with Dolby TrueHD 7.1) to a common video with TrueHD 7.1 audio pass through as you want and even lossless Blu-ray to MKV conversion keeping the original audio tracks, chapter info and subtitles without to do any parameter settings. Mac version is Pavtube ByteCopy for Mac. Below we take the example how to using the Pavtube ByteCopy to convert Blu-ray with TrueHD 7.1 audio.
Full Disc Copy Blu-ray with keeping 7.1 audio using Top Blu-ray Copying tool


Step 1. Add Blu-ray movies
Insert Blu-ray Disc into your external or internal BD drive and launch the Blu-ray Ripping program. Click “disc” button to import Blu-ray movies for converting/copying.

Step 2. Choose an output folder
Click "Browse" button to select a destination folder for the output files.
Step 3. Decide Blu-ray Copy Mode for keeping 7.1 audio
Full Disc Copy Mode: Copy Disney Blu-ray Disc to a full Blu-ray folder containing all the content in original BD.
As soon as the copying task finished, you can click "Open" button to locate the Blu-ray directory. The decrypted Blu-ray folder contains all information and contents in the original disc. Among them, the BDMV folder is the most important one with audio and video files in it. Open BDMV -> STREAM folder and you will find all the .m2ts movie clips.
Tip: To keep TrueHD 7.1 audio, you can also choose “Common Video > WMV3(WMV9)(*.wmv)” as the output format, for it provides the 7.1 audio channels for you. But make sure the original BD disc does contain Dolby TrueHD audio, otherwise you still can’t get Dolby TrueHD 7.1 audio saved.
Note: Make sure the original BD disc does contain Dolby TrueHD audio, otherwise you still can't get Dolby TrueHD 7.1 audio saved.
Step 4. Play Blu-ray files on PC.
After the copy completed, you may click ‘Open’ button to locate the Blu-ray directory. Open BDMV-> STREAM folder and you will find all the m2ts movie clips. For playing the m2ts files, you may use VLC player orKMPlayer.
That’s it! Your Blu-ray video will now be encoded and a few hours later you will have a great high definition video file with preferred audio and subtitles using Pavtube ByteCopy with No Error. Have Fun!
Read More:
- Blu-ray to Personal Cloud | Copy Blu-ray to XBMC | ISO movies to Plex Server | Blu Ray DVD discs across home network
The top Blu-ray Copying tool is able to read TureHD audio and output 7.1 TrueHD passthrough. It supports convert Bluy-ray (with Dolby TrueHD 7.1) to a common video with TrueHD 7.1 audio pass through as you want and even lossless Blu-ray to MKV conversion keeping the original audio tracks, chapter info and subtitles without to do any parameter settings. Mac version is Pavtube ByteCopy for Mac. Below we take the example how to using the Pavtube ByteCopy to convert Blu-ray with TrueHD 7.1 audio.
Full Disc Copy Blu-ray with keeping 7.1 audio using Top Blu-ray Copying tool


Step 1. Add Blu-ray movies
Insert Blu-ray Disc into your external or internal BD drive and launch the Blu-ray Ripping program. Click “disc” button to import Blu-ray movies for converting/copying.

Step 2. Choose an output folder
Click "Browse" button to select a destination folder for the output files.
Step 3. Decide Blu-ray Copy Mode for keeping 7.1 audio
Full Disc Copy Mode: Copy Disney Blu-ray Disc to a full Blu-ray folder containing all the content in original BD.
As soon as the copying task finished, you can click "Open" button to locate the Blu-ray directory. The decrypted Blu-ray folder contains all information and contents in the original disc. Among them, the BDMV folder is the most important one with audio and video files in it. Open BDMV -> STREAM folder and you will find all the .m2ts movie clips.
Tip: To keep TrueHD 7.1 audio, you can also choose “Common Video > WMV3(WMV9)(*.wmv)” as the output format, for it provides the 7.1 audio channels for you. But make sure the original BD disc does contain Dolby TrueHD audio, otherwise you still can’t get Dolby TrueHD 7.1 audio saved.
Note: Make sure the original BD disc does contain Dolby TrueHD audio, otherwise you still can't get Dolby TrueHD 7.1 audio saved.
Step 4. Play Blu-ray files on PC.
After the copy completed, you may click ‘Open’ button
 to locate the Blu-ray directory. Open BDMV-> STREAM folder and you will find all the m2ts movie clips. For playing the m2ts files, you may use VLC player orKMPlayer.
That’s it! Your Blu-ray video will now be encoded and a few hours later you will have a great high definition video file with preferred audio and subtitles using Pavtube ByteCopy with No Error. Have Fun!
Read More:
iDealshare VideoGo is just the most powerful video and audio converter and has been using by most users.
ReplyDelete